Category: Barndominium Design 🎨

  • “Cozy Meets Industrial – Interior Design Tips For Stunning Barndominium Spaces”

    Barndominium spaces thrive when you blend warm textiles, reclaimed wood, and exposed steel to create your cozy industrial aesthetic that feels lived-in yet refined. Use a neutral palette with textured accents, layer ambient and task lighting, mix raw metals with soft fabrics, define functional zones with rugs and furniture, and incorporate smart storage and greenery to soften the industrial edge.

    Key Takeaways:

    • Balance raw industrial elements (steel, concrete, exposed beams) with warm materials (reclaimed wood, plush textiles, area rugs) to make barndominiums feel both rugged and inviting.
    • Layer lighting and finishes-mix pendants, track and task lights with dimmers, and combine matte blacks, brushed metals, and warm woods to create atmosphere and visual depth.
    • Use open, flexible layouts with clear zones and multifunctional furniture; define areas with rugs, shelving, sliding barn doors, and built-in storage to maximize function without closing the space.

    Understanding the Barndominium Concept

    Beyond the stylistic mix, a barndominium combines a metal or post-frame shell with residential finishes, often yielding open-plan layouts, 10-14 foot ceilings, and integrated shop or storage bays. You can expect common sizes between 1,200-3,000 sq ft; many owners choose steel-kit shells for faster builds. Construction typically cuts framing time and allows flexible zoning of living versus utility areas, making these spaces ideal for blending cozy interiors with industrial bones.

    Definition and Origins

    Originating from barn-to-home conversions in rural America, the barndominium evolved as post-frame and steel buildings gave homeowners affordable, open shells to adapt. You’ll find roots in adaptive reuse trends dating back decades, with modern kit packages and pole-barn methods popularized since the late 20th century. Builders often use prefab steel or timber frames, simplifying permitting and accelerating timelines compared with traditional stick-built homes.

    Benefits of Barndominiums

    You gain cost-efficiencies, durability, and multifunctional space: metal shells resist rot and pests, reducing maintenance, while open plans accommodate living, workshop, and storage without extra framing. Many projects run 10-30% below conventional build costs per sq ft and finish faster, letting you allocate budget to high-impact touches like reclaimed wood accents, custom kitchens, or enhanced insulation for year-round comfort.

    For example, a 2,000 sq ft barndominium with a 600-1,000 sq ft attached shop can be built for roughly $100-$160 per sq ft depending on finishes; you can offset utility costs by adding R-20 to R-30 insulated assemblies or closed-cell spray foam, which often trims heating and cooling bills by 15-25%. Mixed-use layouts also boost resale appeal in rural markets where buyers prioritize garage/workspace integration.

    Key Design Elements

    When you define zones in an open-plan barndominium, play with scale and texture: use exposed steel trusses to emphasize verticality, anchor living areas with 8×10 rugs, and lower pendant clusters over dining to create intimacy. Aim for a 60/40 warm-to-industrial material balance, introduce layered lighting from 2700K ambient to 3000K task, and keep sightlines clear so the industrial shell feels intentional rather than cold.

    Blending Cozy and Industrial Aesthetics

    Bring softness into steel-framed spaces by layering textiles-think a wool rug, linen drapes, and 4-6 leather or velvet pillows-while retaining industrial bones like exposed ductwork and matte-black fixtures. Use warm stains on reclaimed wood and add plants or a 36″ wood-burning stove to offset concrete floors; allocate 5-10% of the floorplan to intimate seating clusters to create human-scale moments within expansive volumes.

    Choosing the Right Materials

    Prioritize materials that age well: reclaimed pine or white oak for flooring, A36 hot-rolled steel for visible beams, and polished or sealed concrete for high-traffic zones. Select finishes that resist wear-water-based polyurethane for wood, epoxy or penetrating sealer for concrete-and stainless or galvanized fasteners to prevent corrosion in barn-style humidity. Plan for maintenance: sealed concrete typically needs recoating every 3-5 years.

    Specify material dimensions and installation steps: choose 3/4″ tongue-and-groove hardwood or 5/8″ engineered planks for stability over radiant heat, acclimate reclaimed wood 7-14 days, and install 6mm cork or underlayment for sound dampening. For steel work, request A36 grade beams with hot-dip galvanized brackets and welded connections; insulate walls to R-21 and roofs to R-38 to control condensation around metal, which in a 2,400 sq ft remodel reduced seasonal temperature swings by ~15%.

    Color Schemes and Textures

    Blend warmth and rawness using a 60/30/10 color split: 60% warm neutrals (greige, taupe), 30% mid‑tone materials like reclaimed wood and leather, and 10% industrial accents such as charcoal steel or oxidized copper. You should layer textures-an 8×10 wool rug, nubby throws, and a distressed leather sofa-to ground high ceilings and open plans. Contrast matte concrete floors with satin wood finishes and soft textiles to make large volumes feel intimate.

    Palette Selection for Warmth

    Start with a warm neutral base-Benjamin Moore Revere Pewter or Sherwin‑Williams Accessible Beige-then add two accent colors: one earthy (terracotta, olive) and one deeper tone (navy or charcoal). You can follow the 60/30/10 distribution and reserve bold hues for pillows, art, and a single focal wall. Use 2700-3000K warm LED lighting to keep pigments looking rich after dusk.

    Incorporating Industrial Finishes

    Introduce industrial surfaces selectively: exposed ductwork, brushed steel hardware, polished concrete, and reclaimed corrugated metal panels. You should limit raw metal to roughly 20-30% of visible surfaces to prevent a cold feel, balancing with wood, wool, and plaster. Opt for powder‑coated or brushed finishes on high‑touch items to combine durability with refined texture.

    When working with concrete, seal it with a matte penetrating sealer to reduce dust and staining, and consider a micro‑topping for damaged areas. You can treat steel with clear lacquer or a controlled patina to manage corrosion; use corten as an isolated accent if moisture is present. Add acoustic treatments-plan 2-4 panels per 500 sq ft-or large upholstered pieces to tame reverberation in open barndominiums while keeping the industrial look intact.

    Furniture and Decor Choices

    Balance industrial bones with cozy silhouettes: you mix reclaimed wood tables (72-96 inches) and powder-coated steel frames with plush wool rugs and leather seating. Use scale to define zones-an 84-96-inch sofa anchors the living area while a 72-inch farm table seats six-and aim for 2-3 primary materials plus 3-5 layered textures to keep the space warm yet structured.

    Functional and Stylish Furnishings

    You should choose modular, multiuse pieces-think a sleeper sectional, storage ottoman, or a kitchen island at standard 36-inch height with seating for 3-4. Select durable finishes like top-grain leather, kiln-dried reclaimed wood, and powder-coated steel, and maintain 18-24 inches clearance around dining chairs to ensure circulation while prioritizing form and long-term wear.

    Accessorizing with Intent

    You should place accents with purpose: layer an 8×10 jute under a 6×9 wool rug, use 3-5 pillows in varied fabrics, and hang either a single 48×36 statement piece or a gallery of 3-5 frames above a sofa. Add pendant lighting 24-36 inches in diameter over islands and targeted task lamps to create pockets of warmth without visual clutter.

    When styling further, you should limit metals to two finishes (for example, brass and blackened steel) and restrict your palette to three colors plus neutrals to maintain cohesion. Introduce one vintage find per room-a trunk or industrial locker-and arrange vignettes in odd numbers (3 or 5). For instance, pair a 7-foot sofa with a 48×36 painting and a 24-inch sculptural lamp to create a balanced focal point.

    Lighting Solutions

    You should layer ambient, task, and accent lighting to articulate the open-plan volumes of a barndominium; aim for 100-300 lux in living zones and 300-500 lux at work surfaces, then use dimmers to shift mood. Combine high-mounted ambient fixtures with targeted pendants over islands and adjustable wall washers to highlight raw textures like exposed steel and reclaimed wood, ensuring you balance brightness with warmth (2700K-3000K) for a welcoming industrial-cozy feel.

    Natural vs. Artificial Lighting

    You can exploit clerestory windows and south-facing glazing to flood large spaces with daylight-outdoor illuminance ranges broadly from ~1,000 lux on overcast days to 100,000 lux in direct sun-so plan glazing, light shelves, and skylights to capture that variability. When daylight falls short, back it with layered artificial light: task fixtures of 300-500 lux at counters, 150-250 lux for circulation, and dimmable ambient sources to match daylight color temperature for cohesive scenes.

    Industrial Lighting Fixtures

    You should pick fixtures that read industrial but perform: metal pendants, gooseneck barn lights, caged sconces, and linear LED high bays all suit barndominiums. Specify pendants 12-20 inches in diameter with 800-1,600 lumens each over islands, and 4-8 foot linear fixtures delivering 3,000-6,000 lumens above workbenches; favor CRI ≥90 and 2700K-3500K depending on the space.

    Mount pendants about 30-36 inches above an island for 8-foot ceilings and add ~3 inches per extra foot of ceiling height; use narrow beam (15°-25°) for task spots and wide beam (60°+) for ambient fill. Integrate dimmers, occupancy sensors, and smart scenes so you can tint light levels and color temperature throughout the day. For workshop-adjacent areas choose IP-rated fixtures and LED retrofits with 100-140 lm/W efficiency to lower maintenance and energy use while preserving the industrial aesthetic through finishes like matte black, aged brass, or raw steel.

    Maximizing Space Utilization

    Stretch vertical volume by adding mezzanines or lofts-half-lofting a 24×36 bay can yield roughly 400 sq ft of extra usable area-and keep circulation at 36-48 in. to maintain flow. Fit 12-24 in. deep built-ins into structural bays, swap swinging doors for sliding barn doors to reclaim 3-4 sq ft per opening, and cluster plumbing/wiring to reduce wasted corridor space so you can add a pantry or reading nook without expanding the footprint.

    Open Floor Plans

    Define zones with furniture and scale instead of partitions: anchor the living area with an 8×10 rug and a 84-96 in. sofa, use a 4×8 island to separate kitchen tasks and seat four, and vary ceiling height or lighting intensity to signal transitions. You should maintain 42 in. minimum behind islands for single-cook kitchens and 48 in. for multi-cook layouts to preserve usable work and traffic lanes.

    Multi-functional Areas

    Convert guest rooms into dual-purpose spaces by installing a Murphy bed or a fold-down wall bed paired with a built-in desk and shelving; a wall bed can reclaim 60-100 sq ft of daytime floor space. Employ fold-away dining tables (24-30 in. depth when stowed), banquette seating with 18-24 in. under-seat storage, and mobile islands to let a single room serve as office, guest room, and hobby studio.

    In one practical layout, combine mudroom, laundry, and pet-care station along a single 10-12 ft wall: stackable washer/dryer (27 in. depth) under a 24 in. work counter, overhead cabinets 12-15 in. deep, and a fold-down dog-wash basin to keep services centralized. Plan dedicated circuits and task lighting of 300-500 lux for work surfaces, and reinforce framing where loft beds or heavy storage will load joists to ensure long-term performance.

    Final Words

    Drawing together the warmth of cozy elements and the raw edge of industrial materials, you can create a balanced barndominium that feels both inviting and architecturally striking. Prioritize layered textures, thoughtful lighting, and scale to make your open spaces intimate without losing industrial character. Use durable finishes, strategic storage, and curated decor to ensure functionality and personality throughout your home.

    FAQ

    Q: How can I successfully blend cozy and industrial styles in a barndominium without the space feeling cold or overly raw?

    A: Begin by balancing hard and soft elements: expose structural features like steel beams and concrete floors, then counter them with warm wood finishes, layered rugs, and plush textiles. Use reclaimed wood for shelving or accent walls to add patina and warmth, and introduce textiles (wool throws, linen curtains, upholstered seating) to soften echo and visual harshness. Maintain an open layout typical of industrial design but carve intimate zones with area rugs, lighting clusters, and furniture groupings to create inviting pockets throughout the barn-like volume.

    Q: Which materials and finishes achieve an industrial look while keeping the interior inviting?

    A: Combine raw, utilitarian materials-exposed brick, steel, concrete-with warm, tactile finishes such as oiled hardwoods, matte bronze or brass metalwork, and natural stone. Opt for matte or honed concrete rather than high-gloss to avoid a sterile feel; add wood ceiling beams or reclaimed planks to introduce warmth and texture. Choose warm-metal fixtures (aged brass, blackened steel) and pair them with leather or boucle upholstery to maintain industrial character without sacrificing comfort.

    Q: What color palette works best for a cozy-industrial barndominium?

    A: Start with a neutral base-warm greys, soft taupes, and off-whites-to highlight structural elements while keeping the atmosphere warm. Layer in deeper accent tones like charcoal, navy, olive, or terra cotta for depth, and use muted metallics or warm wood tones as secondary accents. Introduce small pops of color via textiles, art, or cabinetry to prevent monotony while preserving the restrained industrial aesthetic.

    Q: How should I approach lighting to make a high-ceiling barndominium feel intimate and functional?

    A: Use layered lighting: ambient illumination from recessed cans or pendant clusters, task lighting over work areas (pendants above islands, adjustable sconces by reading chairs), and accent lighting to highlight textures and architectural features. Hang larger statement fixtures (industrial chandeliers or linear pendants) at varying heights to scale down vast ceilings, and install dimmers to control mood. Maximize natural light with large windows or skylights and soften it with translucent window treatments to reduce glare while preserving coziness.

    Q: What furniture choices and layout strategies optimize comfort and flow in a barndominium?

    A: Define functional zones in the open plan-living, dining, kitchen, workspace-using rugs and furniture orientation rather than walls. Select substantial, comfortable seating (deep sofas, modular sectionals) to anchor living areas and balance industrial proportions. Mix metal-framed pieces with warm wood surfaces, and incorporate multipurpose furniture (storage benches, credenzas) to keep clutter contained. Position circulation paths clearly, allow for natural sightlines to focal points like a fireplace or kitchen island, and consider built-in storage or custom cabinetry to maintain a streamlined, lived-in look.

  • “10 Inspiring Barndominium Design Ideas You’ll Want To Steal For Your Own Home”

    Barndominium living blends rugged durability with refined comfort, and in this list you’ll find ten design ideas to transform your space into a stylish, functional home. From open-concept interiors and reclaimed wood accents to energy-efficient systems and smart storage solutions, each idea shows how you can balance farmhouse charm with modern convenience to create a barndominium that reflects your lifestyle and elevates everyday living.

    Key Takeaways:

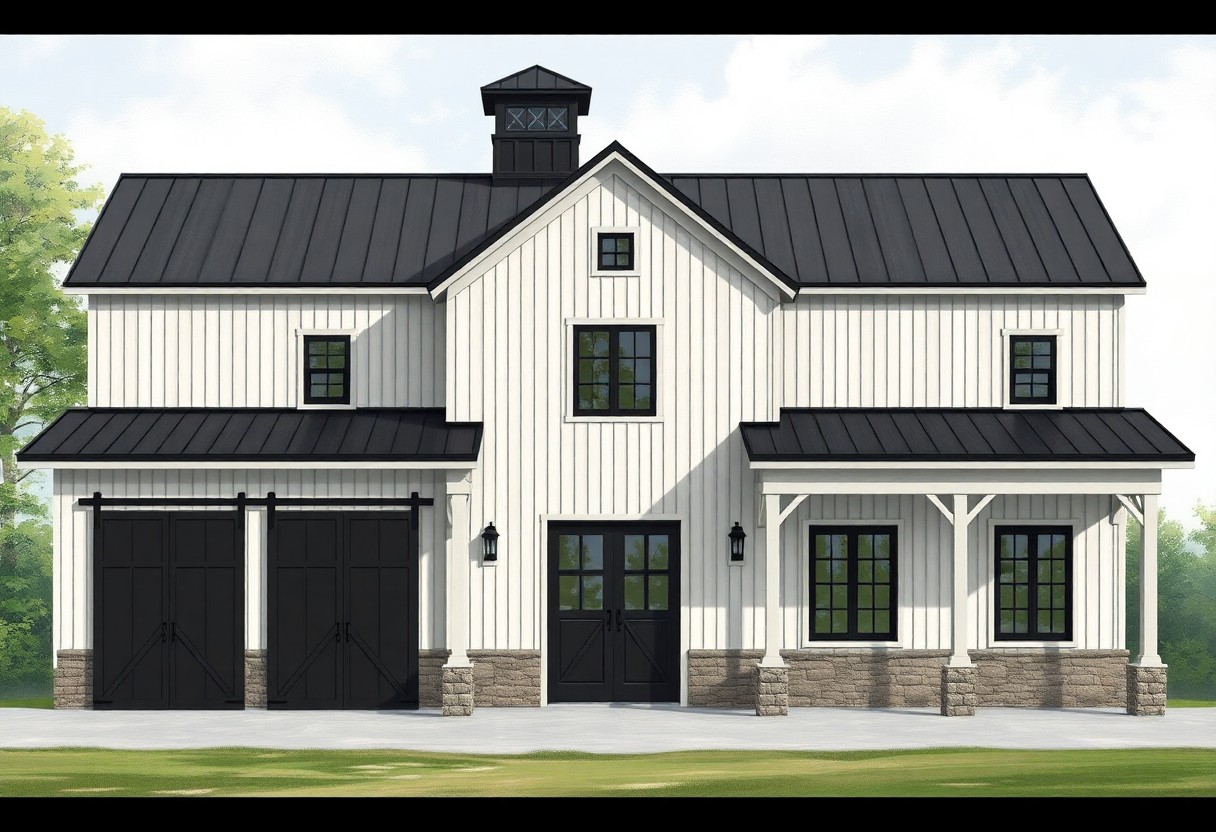
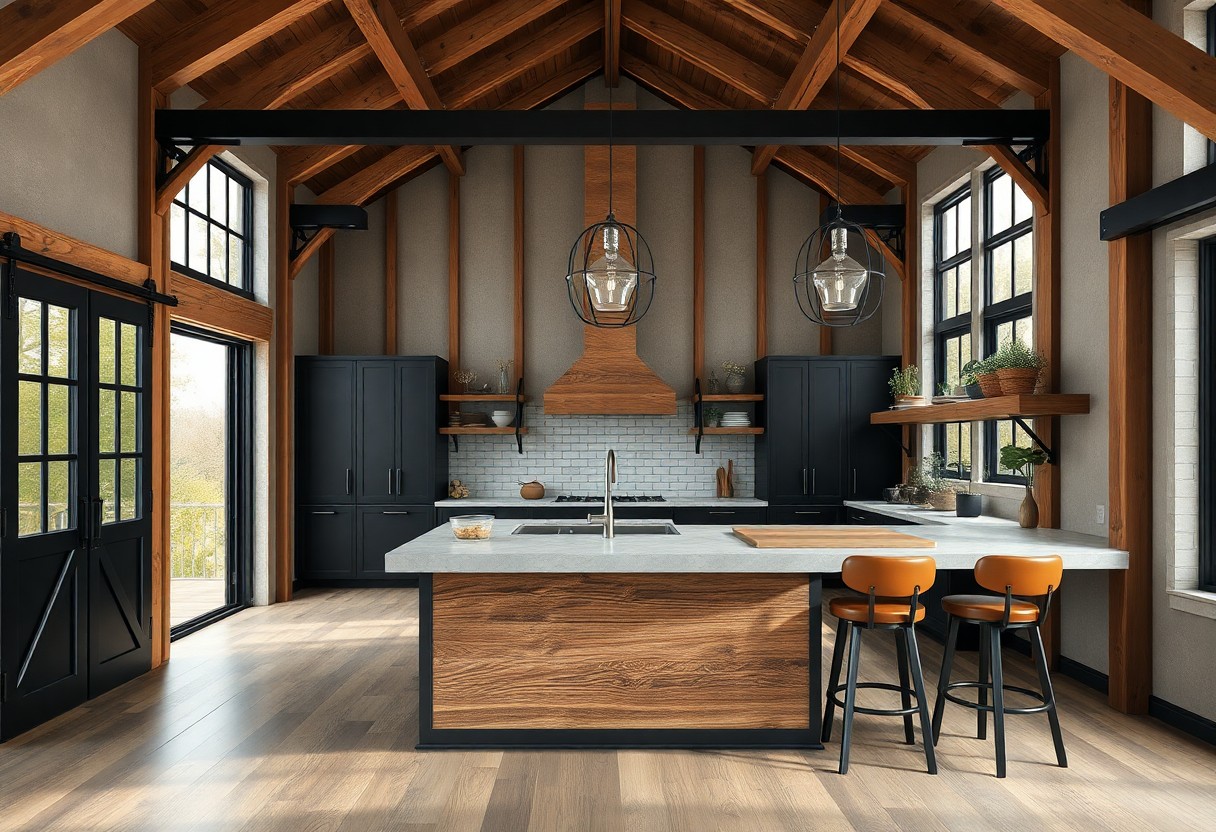
    • Blend rustic barn elements (exposed beams, metal siding) with modern finishes for a stylish, livable aesthetic.
    • Prioritize open-concept layouts, lofts, and flexible rooms to maximize space and adaptability.
    • Use durable, low‑maintenance materials and energy‑efficient systems while integrating practical features like garages and covered porches.

    Open Concept Living Space

    You can transform a barndominium into a seamless open concept living space that maximizes natural light and social flow, allowing cooking, dining, and lounging to coexist without barriers; this layout emphasizes multifunctional furniture, clear sightlines, and flexible zones that adapt as your needs change.

    Spacious floor plan

    You’ll benefit from a spacious floor plan that defines areas through furniture arrangement, rugs, and lighting rather than walls, creating roomy circulation, versatile entertaining spaces, and the ability to reconfigure zones as your lifestyle or family grows.

    High ceilings

    You can leverage high ceilings to amplify a sense of volume and sophistication, using tall windows, exposed beams, or lofted areas to enhance light and drama while keeping the main level feeling open and airy.

    To make high ceilings work for your home, scale lighting and furnishings appropriately-oversized pendants, long curtains, and vertical artwork create balance; consider acoustic treatments and efficient HVAC zoning to control echo and temperature without sacrificing the expansive aesthetic you want.
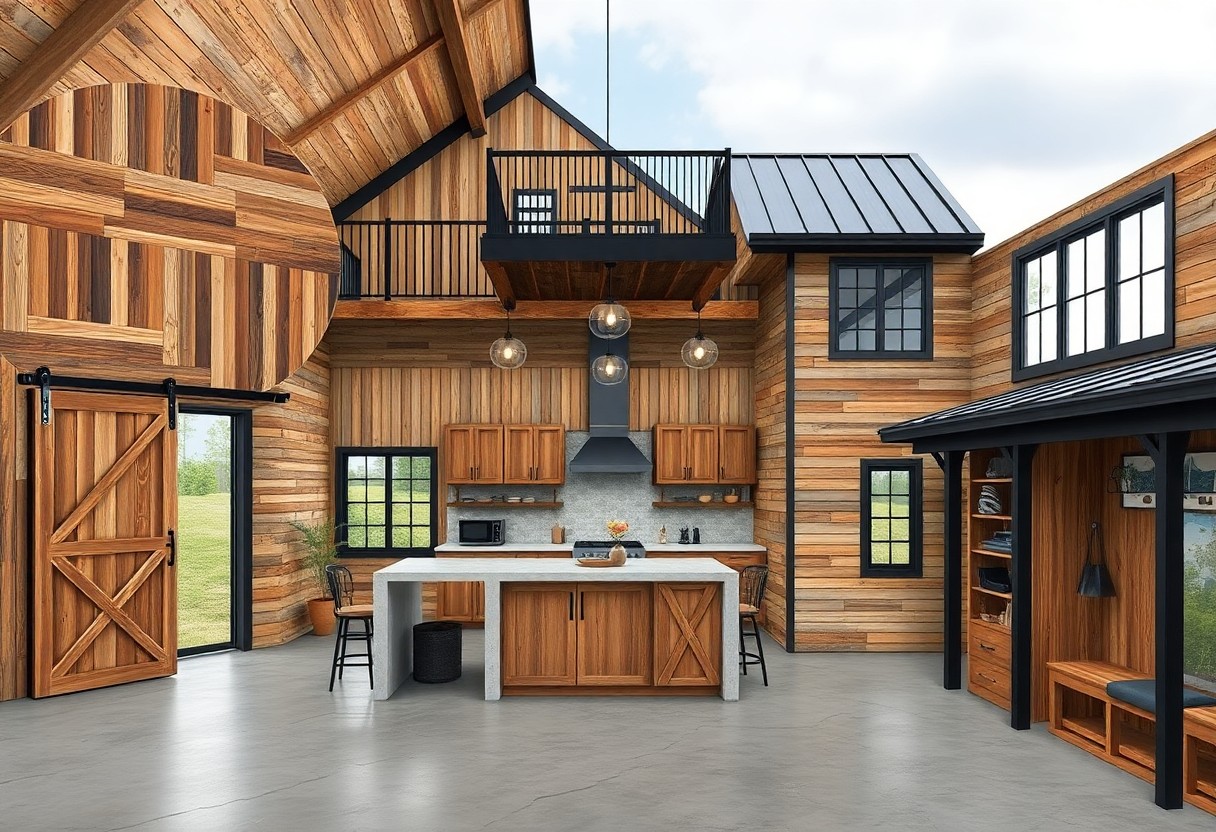
    Rustic Wood Accents

    You’ll give your barndominium instant warmth and depth by incorporating rustic wood accents-floors, wall planks, and trim-that balance industrial metal and open spaces. Choose rich finishes and consistent grain patterns to maintain cohesion, and place wood strategically to define zones without overwhelming the airy layout.

    Exposed beams

    You can use exposed beams as architectural statements that add height and rhythm to interiors; oversized or distressed beams introduce scale while carefully proportioned beams maintain openness. Stain or paint to match your palette, and integrate lighting and HVAC to preserve a clean, intentional look.

    Reclaimed wood elements

    You should incorporate reclaimed wood for floors, accent walls, and cabinetry to infuse history and texture; its weathered patina provides instant character and pairs beautifully with contemporary fixtures. Select pieces with stable thickness and treat them to prevent pests and moisture issues.

    You’ll find reclaimed wood from barn salvages, deconstructed homes, or specialty suppliers-inspect for nails, rot, and chemical treatments before purchase. Mill or plane boards for a uniform surface, fill gaps for flooring stability, and finish with breathable sealers that protect while preserving patina. Mix species deliberately for contrast, and allow acclimation time to your climate before installation.

    Modern Kitchen Features

    In a barndominium, modern kitchen features give you a balance of industrial strength and refined convenience, with durable surfaces, smart storage, and smart home integration that streamline cooking, increase efficiency, and elevate resale appeal.

    Sleek appliances

    Sleek appliances with integrated panels, stainless or matte finishes, and smart connectivity let you maintain a clean visual line while boosting performance; choose professional-grade ranges, quiet dishwashers, and app-enabled refrigerators to make your kitchen both stylish and highly functional.

    Large kitchen island

    A large kitchen island becomes the command center of your barndominium, offering prep space, casual dining, storage, and the option to incorporate a sink or cooktop so you can centralize tasks and socialize while you work.

    When planning your island, allocate at least 42-48 inches of clearance on all sides, include drawers and open shelving for varied storage, and incorporate power, task lighting, and seating for three to five people; select a durable surface like quartz or butcher block to withstand heavy use and tie the island’s finish to your overall palette for cohesion.

    Cozy Fireplaces

    A cozy fireplace anchors your barndominium, offering warmth and character whether you choose a traditional wood-burning hearth or a sleek gas insert; you can frame it with a reclaimed-wood mantel, built-in benches, or a tile hearth to create an inviting gathering spot that complements open ceilings and metal accents.

    Stone surrounds

    Stone surrounds bring rugged texture and timeless appeal to your fireplace; you can use floor-to-ceiling stone for drama or mixed-size stones for layered interest, pairing warm-toned materials with soft lighting and leather seating to balance the industrial barn aesthetic with homey comfort.

    Masonry options

    Masonry options range from full traditional brick or stone walls to lightweight veneers that mimic mass masonry while reducing load; you can select brick for classic warmth, poured concrete for modern minimalism, or stucco for a smooth, rustic finish that ties into your exterior palette.

    When you choose masonry, weigh factors like structural support, insulation, and maintenance: full masonry provides thermal mass and longevity, while veneers are quicker and more budget-friendly to install; coordinate mortar color, joint profile, and sealers to ensure weather resistance and a cohesive look with your barn’s materials.

    Expansive Windows

    Floor-to-ceiling glazing transforms your barndominium by merging interior and exterior, bathing rooms in daylight and enlarging perceived space. You can arrange windows to showcase architectural features, improve ventilation, and enhance passive solar benefits while maintaining a clean, contemporary aesthetic.

    Natural light

    Maximizing natural light reduces reliance on artificial lighting and elevates mood; you can use clerestories, skylights, and large casements to direct sunlight where you need it most. Combine low-E glass and proper orientation to control heat gain and glare without sacrificing brightness.

    Scenic views

    Strategically placed picture windows and sliding glass doors let you frame pastures, woodlands, or mountain vistas, turning views into living-room focal points. You can create seamless indoor-outdoor flow that invites the landscape in and anchors daily life to the surrounding setting.

    To make views work for you, consider window height, sightlines, and the placement of furniture so vistas remain unobstructed. Use mullion patterns, overhangs, and landscaping to compose the scene; add operable sections for fresh air and motorized shades to manage privacy, glare, and seasonal sun without compromising the view.

    Luxurious Bathrooms

    Transform your barndominium bathroom into a refined retreat by blending industrial elements with plush finishes; you can pair metal and concrete accents with heated floors, layered lighting, and custom vanities to create comfort without losing barn character, while smart storage and high-end fixtures keep the space functional and elegant.

    Spa-like amenities

    You can introduce steam showers, a deep soaking tub, towel warmers, and integrated sound to recreate a spa experience at home; prioritize energy-efficient fixtures and dimmable lighting, and use natural materials like stone and warm wood to balance the barn’s rugged aesthetic with soothing comfort.

    Walk-in showers

    Walk-in showers create openness and accessibility-choose a curbless entry with a linear drain and frameless glass to preserve sightlines, and use large-format tiles for a seamless look while adding a rainhead for a luxurious, hotel-style rinse.

    For more functionality, include a built-in bench, recessed niches for toiletries, and a handheld wand for convenience; consider steam capability, layered task and accent lighting, and proper waterproofing and slope planning so your walk-in shower performs beautifully and fits your barndominium’s style.

    Outdoor Living Areas

    Your barndominium’s outdoor living areas extend your home into the landscape, creating spaces for dining, relaxing, and entertaining. You can blend rustic metal and reclaimed wood with comfortable seating, outdoor kitchens, and layered lighting to craft year-round usability. Thoughtful flow between indoor and outdoor zones maximizes square footage and keeps maintenance low with durable, weather-resistant materials.

    Covered porches

    Covered porches give you a sheltered transition between indoors and the yard, letting you enjoy fresh air in shade or rain. You can outfit them with ceiling fans, heaters, cozy seating, and durable flooring that resists moisture and wear. Consider integrating roll-down screens or glass panels to increase usability across seasons without sacrificing the open-air feel.

    Fire pits

    Fire pits serve as social anchors for your outdoor living area, providing warmth, ambiance, and a focal point for gatherings. You can choose freestanding bowls, built-in pits, or gas units to match your aesthetic and maintenance preference. Arrange seating for sightlines and safe clearances, and use noncombustible materials for surrounding surfaces.

    When planning a fire pit you should size it to match your group, position it away from overhangs and vegetation, and set it on a stable, nonflammable base like gravel, pavers, or concrete. Select materials-steel, cast iron, or stone-based on durability and style, and install screens or covers for ember control. Check local codes and fuel-source options to ensure safe, compliant installation and easy upkeep.

    Unique Staircase Designs

    Staircases define circulation and style in a barndominium; you can choose sculptural forms or minimalist runs that blend metal, wood, and glass to match your aesthetic. Open risers boost light, integrated storage beneath treads maximizes utility, and thoughtfully chosen railings can echo barn hardware while complying with safety codes.

    Spiral options

    Spiral staircases save floor area and introduce instant visual drama; you can pick tight industrial steel spirals for compact efficiency or sweeping helical wood versions for elegance. Use them as focal features with pendant lighting or a skylight, and ensure tread depth and railing height support comfortable, safe use.

    Floating styles

    Floating staircases give a barndominium an airy, modern edge; you can choose cantilevered treads anchored to a concealed steel spine or glass-side stringers that make steps appear to hover. They pair beautifully with exposed trusses and wide-plank or polished concrete floors to amplify openness.

    For floating stairs you should prioritize material and structure-thick hardwood for warmth, steel for an industrial look, or laminated glass for minimalism-and arrange professional engineering and installation. Integrated LED lighting under treads enhances the floating illusion and improves nighttime navigation without adding visual clutter.

    Versatile Loft Spaces

    A versatile loft lets you reclaim vertical square footage as a multi-use zone that supports living, working, and relaxing without sprawling floor plans. You can define zones with rugs, railings, and low walls while preserving sightlines; add skylights, layered lighting, and built-in storage to maintain openness and functionality; and choose durable finishes that handle traffic and seasonal temperature swings so your loft adapts as your needs change.

    Home office

    Turn your loft into a productive home office by placing a streamlined desk near natural light, adding task lighting, and installing floating shelves to keep work materials organized. You can incorporate acoustic panels or rugs to reduce noise, use vertical storage to save floor space, and select ergonomic seating so longer sessions don’t wear you down; a cohesive color palette helps maintain focus and professionalism.

    Guest room

    Convert the loft into a welcoming guest room with a murphy bed or a sleeper sofa, layered bedding, and blackout window treatments to ensure restful nights. You can include a compact wardrobe or open hooks for clothing, bedside lighting for reading, and modular furniture that folds or tucks away so the space returns to multi-use when guests leave.

    For extra hospitality, provide easy-access outlets and charging stations, versatile bedding options for different preferences, and a portable privacy screen if the loft is open to lower levels. You can add a luggage bench or low table, install climate controls or a fan for comfort, and keep a small basket of necessarys-towels, toiletries, and local recommendations-to make arrivals effortless and leave a strong impression.

    Energy-Efficient Features

    You can dramatically cut utility bills and boost comfort by designing energy efficiency into your barndominium from the start. Focus on airtight construction, high-R insulation in walls and roof, properly sized HVAC, and passive measures like orientation and shading. Combining these strategies with smart controls and efficient appliances makes your home more durable, quieter, and less expensive to operate.

    Solar panels

    You can offset a significant portion of your electricity use by adding solar panels, which integrate well with metal roofs common on barndominiums. Prioritize optimal tilt and orientation, consider battery storage for resiliency, and take advantage of local incentives to improve payback. Proper system sizing and inverter choice ensure your installation meets your household load and future expansion.

    Insulated windows

    You should select double- or triple-pane insulated windows with low-E coatings and thermally broken frames to reduce heat transfer and control glare. These windows improve comfort year-round, lower HVAC demand, and limit condensation. Proper flashing and airtight installation are imperative to realize the full energy benefits and protect the envelope.

    For even better performance, choose windows with low U-factor and appropriate SHGC for your climate, and consider argon or krypton gas fills and warm-edge spacers to boost insulation. Match frame material to durability and maintenance needs, and have a professional verify installation, sealing, and alignment so your windows perform as specified over decades.

    Custom Lighting Fixtures

    Custom lighting transforms a barndominium from utilitarian to unforgettable; you can commission fixtures that echo your structure’s raw beams while delivering layered illumination for every zone. Select finishes that tie to metalwork or reclaimed wood, plan dimming for mood, and position accents to showcase art or architectural features so your home feels curated and distinctly yours.

    Statement chandeliers

    Statement chandeliers anchor large, open spaces and give your living or dining area instant personality. Choose oversized silhouettes or mixed materials-wrought iron, brass, or reclaimed wood-to match your palette; scale to ceiling height and keep proper clearance above tables. A bold chandelier becomes both focal point and functional source, blending rustic character with refined design that reflects your style.

    Pendant lights

    Pendant lights offer focused task lighting and sculptural interest above islands, counters, and reading nooks; you can layer single pendants with clusters to create rhythm across long surfaces. Vary shapes and finishes to complement or contrast exposed beams, and use adjustable stems or cords so you place light exactly where you need it.

    For performance, choose pendants with appropriate lumen output and color temperature-warm LEDs for cozy zones, neutral or cool for work areas-and add diffusers to reduce glare. You should space multiple pendants about 30-36 inches apart above islands and hang them roughly 30-36 inches above counters; opt for dimmable or smart bulbs so you control ambiance as activities change.

    Functional Mudrooms

    A well-planned mudroom in your barndominium acts as a transition zone that keeps dirt out of living spaces while supporting daily routines; you can include durable flooring, a designated drop zone for gear, and clear sightlines to the rest of the home so entries stay organized and traffic flows smoothly.

    Storage solutions

    You should prioritize modular storage that adapts to changing needs: open cubbies for shoes, closed cabinets for seasonal gear, high shelves for seldom-used items, and labeled bins to keep everything accessible-durable materials and simple layouts make maintenance easy in a busy household.

    Built-in benches

    Built-in benches give you a practical spot to sit while putting on boots and provide hidden storage beneath; integrated hooks or a shelf above the bench create a compact, efficient landing area that keeps clutter contained near the entry.

    When planning built-in benches, consider depth for comfortable seating, durable upholstery or wipeable surfaces, and drawers or lift-top compartments for shoes and pet supplies; incorporating electrical outlets nearby lets you add a charging station or heated boot tray for added convenience.

    Bold Color Palettes

    Embrace bold color palettes to give your barndominium instant personality; deep navy, forest green, or terracotta paired with crisp neutrals create a modern yet rustic vibe you can lean into. Use saturated tones on cabinetry, furnishings, or large textiles to define zones and amplify the barn’s architectural character.

    Accent walls

    Make a single accent wall the focal point by painting or cladding it in a bold hue or reclaimed wood; you’ll anchor living areas and bedrooms without overwhelming the space. Pair the wall with neutral finishes and strategic lighting to highlight texture and maintain balance throughout your home.

    Trendy combinations

    Mix contemporary and rustic colors-charcoal with warm oak, olive with matte black, or blush with raw steel-to craft a sophisticated contrast that suits a barndominium’s hybrid identity. You’ll create depth by repeating tones in textiles, trim, and metalwork for cohesive flow between rooms.

    To execute trendy combinations, pick one dominant tone and two supporting shades: a deep anchor, a warm mid-tone, and a bright accent. Test samples under different light, balance cool and warm undertones, and use finishes-matte, satin, or metallic-to control contrast while keeping your palette unified across interiors.

    Stylish Sliding Barn Doors

    Sliding barn doors are a signature barndominium element that blend industrial function with refined style, letting you define spaces without sacrificing flow. You can choose hardware, finishes, and track styles to match your aesthetic while improving accessibility and adding a dramatic focal point to living areas or bedrooms.

    Space-saving

    Because they glide along a wall instead of swinging, sliding barn doors free up floor space and simplify furniture layouts. You can use them to close off tight bathrooms, closets, or home offices while preserving circulation and visual openness, making small or irregular rooms feel larger and more efficient.

    Rustic charm

    Rustic sliding doors bring warmth through reclaimed wood, hand-hewn textures, and matte black or aged metal hardware, helping you create an authentic, lived-in vibe. You can pair them with modern fixtures to balance softness and structure, ensuring your interior feels both cozy and contemporary.

    For a richer rustic effect, select wood species with visible grain and natural imperfections, and consider distressing techniques or stains that highlight character. Choose barn-style hardware with durable rollers and soft-close options for daily use, and seal the finish to protect against humidity and wear while preserving the handcrafted look you want in your home.

    Smart Home Technology

    Integrating smart technology turns your barndominium into a responsive, secure, and efficient living space. You can centralize lighting, climate, security, and entertainment through a single hub or voice assistant, simplifying daily routines and enhancing resale appeal. Choose systems with open standards to ensure future upgrades and seamless device interoperability.

    Automated systems

    Automated systems let you schedule scenes, control access, and trigger actions based on sensors so your barndominium anticipates needs. You can create morning routines that raise shades, start coffee, and adjust thermostats, or set geo-fenced locks and lighting that respond when you arrive. Prioritize reliable hubs and local processing for faster, more private automation.

    Energy management

    Energy management systems give you real-time insight into consumption and let you shift loads to save money and reduce demand. Smart thermostats, connected appliances, and automatic scheduling optimize comfort while lowering bills; pairing solar panels with battery storage and an intelligent energy gateway helps you store excess power and use it when rates peak.

    Use energy dashboards and smart meters to identify high-usage devices and change behaviors or automate savings. You can schedule EV charging for off-peak rates, set appliances to run when solar production is highest, and configure demand response participation to earn credits. Choosing an energy platform that integrates weather forecasts and utility tariffs helps you automate cost-effective decisions and ensures resilience during outages.

    Beautiful Landscaping

    Well-planned landscaping frames your barndominium, balancing native plantings, mulched beds and open lawn to complement the building’s lines while reducing maintenance and water use. Strategic groupings of trees and shrubs provide year-round interest, define outdoor rooms and shelter wind-exposed areas to enhance comfort and curb appeal.

    Garden areas

    You can carve garden areas into terraces, pollinator-friendly beds or formal layouts that echo the barn’s geometry; raised beds, native perennials and drought-tolerant shrubs keep upkeep low while delivering strong seasonal color and texture that ties the house to the landscape.

    Pathways

    Pathways draw guests to your entry, porch and outdoor living zones; choose materials-gravel, reclaimed brick, pavers or concrete-based on style, traction and maintenance, and align routes with sightlines to create an inviting, cohesive approach.

    For pathways, consider width, slope and transitions so routes are comfortable and accessible; incorporate subtle lighting, edging and proper drainage to prevent erosion, and mix textures-stepping stones with groundcover or a bordered gravel strip-to add visual interest without increasing long-term upkeep.

    Artistic Decor Choices

    You can blend industrial beams and soft textiles to create a signature barndominium aesthetic that feels refined yet lived-in. Choose a restrained palette, layer textures like reclaimed wood, matte metal, and woven rugs, and use oversized art or sculptural lighting as focal points. Aim for balance between open spaces and curated displays so your home reads cohesive, intentional, and welcoming to guests and family alike.

    Local artwork

    You should source paintings, prints, and ceramics from nearby artists to anchor your barndominium in its region. Local pieces introduce authentic color stories and motifs that reflect landscape and culture; they also foster community ties. Place works where natural light flatters texture, rotate smaller pieces seasonally, and mix gallery-style arrangements with single large canvases to create dynamic focal points that feel both personal and professionally curated.

    Personal touches

    You can make the space unmistakably yours by incorporating family heirlooms, handcrafted furniture, and DIY accents. Repurpose barn elements as shelving or headboards, display travel finds with intentional groupings, and keep frequently used items attractive and accessible so form serves function. These details add narrative depth and warmth, turning structural character into a lived-in, inviting environment that reflects your taste and history.

    To amplify personal impact, curate vignettes that balance scale and negative space: group three to five objects with varied heights, anchor them on trays or books, and use consistent frames for photo walls. Integrate textiles-quilts, throws, rugs-with colors that echo your art, and rotate items seasonally to keep the home evolving. Let functional items like a well-worn toolbox or pottery be part of the decor so your story is both visible and useful.

    Unique Floor Materials

    Mixing reclaimed wood, polished concrete, and natural stone gives your barndominium character while addressing function and budget; you can zone different materials for living, work, and utility areas to handle traffic, moisture, and acoustics. Prioritize durable finishes where pets or heavy gear are common, and use area rugs or mats to soften cold surfaces and define cozy spaces.

    Concrete finishes

    Polished, stained, or textured concrete provides a low-maintenance, industrial-chic foundation that suits open barndominium plans; you can enhance warmth with integral color, acid stains, or overlays that mimic tile or stone. Concrete’s thermal mass moderates indoor temperature, but you should specify proper sealing and anti-slip treatments for safety and long-term resistance to abrasion and staining.

    Hardwood options

    Hardwood adds timeless warmth and visual depth to your barn-inspired interior; you can choose solid planks for traditional rooms or engineered boards for areas with variable humidity. Select species, plank width, and finish based on foot traffic and desired maintenance-harder species and matte urethane finishes hide wear better in high-use zones.

    When dicking out species and construction, you can weigh cost versus durability: oak and hickory resist dents and frequent refinishing, while walnut and maple offer rich tones but may show wear sooner. Engineered hardwood performs best over concrete slabs or heated floors, and wire-brushed or distressed textures help conceal scratches. Factor in refinishing frequency, finish type (oil vs. polyurethane), and installation method to match your lifestyle and long-term goals.

    Multi-Functional Spaces

    Design flexible zones that shift with your needs-open layouts let you combine living, work, and entertainment areas without feeling crowded. Use sliding partitions and modular furniture so you can quickly reconfigure rooms for guests, projects, or a home office, maximizing every square foot of your barndominium.

    Gym areas

    Carve out a gym area with impact-resistant flooring, proper ventilation, and abundant natural light so you stay motivated. Install wall storage and fold-away equipment to free floor space, add mirrors for form checks, and position the room near a bath or utility sink for quick cleanups after intense workouts.

    Craft rooms

    Create a craft room with a large worktable, task lighting, and adjustable shelving so your supplies stay organized and accessible. Choose washable surfaces and easy-to-clean floors, plus a power strip and pegboard to keep tools within reach while you focus on projects.

    Plan zones for cutting, painting, and storage so you can jump between tasks without constant cleanup. Incorporate labeled bins, clear drawers, and a mobile island that you can roll into natural light; add a dedicated sink and exhaust fan for messy mediums, and mount pegboards and focused lighting over each workstation to keep everything efficient.

    Personalized Touches

    Infuse your barndominium with personality through curated accents that reflect how you live and what you love; combine reclaimed wood, metalwork, and textiles to soften industrial lines while keeping a cohesive color story that feels like yours.

    Family photos

    Arrange family photos as a gallery wall using mixed frame styles with consistent mats; you can anchor the display above a sofa or stair landing, rotate images seasonally, and add small ledges for keepsakes to create a dynamic, personal focal point.

    Travel mementos

    Showcase travel mementos as decorative focal points-framed maps, ticket stubs, postcards, and collected objects grouped by destination tell compelling stories; use shadow boxes and floating shelves to protect delicate items while highlighting your adventures.

    For durability and style, install recessed shelving with built-in lighting to spotlight fragile finds, and label pieces with discreet tags; you can integrate functional souvenirs-like carved bowls or textiles-into everyday use, and rotate displays to prevent dust buildup while keeping your travel story fresh.

    Summing up

    As a reminder, the ten barndominium design ideas show how you can blend rustic character with modern comfort, optimize open-plan layouts, incorporate durable and sustainable materials, maximize natural light and storage, and extend living outdoors. Use these concepts to prioritize function, personalize finishes, and plan efficient systems so your barndominium reflects your lifestyle while remaining resilient, efficient, and unmistakably stylish.

    FAQ

    Q: How do I choose the best layout for a barndominium that balances living space and workshop/garage needs?

    A: Start by mapping daily routines and how much of the building will be dedicated to hobbies, equipment, or vehicles versus living areas. Popular layouts place the workshop/garage on one end with a clear internal entry and sound/thermal separation from bedrooms; lofts or mezzanines provide extra sleeping or storage without expanding the footprint. Open-plan common areas (kitchen, dining, living) make efficient use of the tall, open barn volume while providing flexibility for future reconfiguration. Consider circulation – locate bathrooms and mechanicals near bedrooms for plumbing efficiency, and add a mudroom or vestibule between the shop and living space to control dust and temperature transfers. Include rough-in locations for utilities and plan storage and mechanical space early to avoid costly relocations later.

    Q: Which materials and finishes keep a barndominium feeling authentic but still modern and low-maintenance?

    A: Combine metal siding or corrugated panels with reclaimed timber accents for an authentic barn look that’s durable and low-maintenance. Concrete slab or polished concrete floors offer an industrial-modern base that’s easy to heat and clean; add area rugs to soften living spaces. Exposed steel beams paired with warm wood cabinetry and matte black hardware create a contemporary-rustic contrast, while composite decking and aluminum-clad windows reduce upkeep outdoors. For interiors, use moisture-resistant drywall or siding in high-humidity areas and choose finishes with good abrasion resistance in workshop-adjacent zones. Finish selections should prioritize longevity and ease of repair while reflecting the aesthetic balance you want between rustic and refined.

    Q: What are the most effective strategies to make a barndominium energy-efficient and comfortable year-round?

    A: High-performance insulation for walls and roof is vital; insulated metal panels or a continuous exterior insulation system plus a well-sealed roof cavity reduce thermal bridging. Install high-efficiency HVAC sized for the open volume and consider options like radiant floor heating for even warmth, and heat-recovery ventilation to maintain fresh air without energy loss. Choose double- or triple-glazed windows and position glazing for passive solar gain in winter while using overhangs, shades, or operable screens to limit summer heat. Air sealing at penetrations, proper attic ventilation, and attention to garage-to-living thermal separation will significantly cut heating and cooling loads. Consider solar PV, battery storage, or a hybrid heating system to further lower operating costs.

    Q: How can I create seamless indoor-outdoor living and effective landscaping for a barndominium site?

    A: Large sliding or folding glass doors and covered porches create visual and physical continuity between interior living areas and patios or decks, extending usable space and improving natural light. Use the same or complementary floor materials at the threshold to blur the line between inside and outside, and design a gentle grade with proper drainage away from the foundation. Native drought-tolerant plantings, gravel paths, and hardy grasses reduce maintenance and reflect rural character; cluster plantings to create outdoor “rooms” for dining, fire pits, or workshops. Add durable outdoor features like a covered workspace, storage outbuilding, or integrated outdoor kitchen to increase functionality, and orient landscape elements to shield prevailing winds or provide summer shade where needed.

    Q: What budgeting and planning tips help control costs when building a barndominium, and should I buy a kit or hire a custom contractor?

    A: Start with a clear budget that separates foundation, shell, systems (HVAC, plumbing, electrical), and finishes so you can prioritize where to invest. Barndominium kits or pre-engineered shells can save time and reduce framing costs, but custom builds offer greater control over layout and finishes; compare total delivered costs, transport, and local labor availability. Save by phasing finishes, doing selective DIY work (painting, trim, landscaping), and sourcing reclaimed materials for accent features. Obtain multiple detailed bids, verify contractor references and licensing, and account for permitting, utility hookups, and site prep in the schedule and contingency (typically 10-20%). Plan inspections and approvals early to avoid delays that drive up costs.

  • DIY Small Barndominium – Easy Projects for Your Tiny Barn Home

    Over the years, you can transform your small barndominium into a stylish, highly functional home with manageable projects that maximize storage, light, and comfort; this guide provides proven DIY builds, layout strategies, and budget-friendly finishes you can tackle step-by-step to boost livability and resale value while preserving rustic charm.

    Key Takeaways:

    • Plan layout, insulation, plumbing and electrical first and secure necessary permits before starting projects.
    • Maximize functionality in tiny spaces with lofts, built-in storage and fold-down or multi-use furniture.
    • Cut costs using reclaimed materials and DIY finishes (flooring, countertops, cabinets); prioritize projects by skill level and budget.

    Benefits of a Barndominium

    You get a durable, low-maintenance shell with flexible interior space that adapts to changing needs: steel or wood frames often allow finishes to be changed without major structural work, a metal exterior can last 40-60 years, and many owners report completing basic builds in 3-6 months. You’ll also reduce long‑term upkeep and, with proper insulation and orientation, cut energy bills substantially compared with similarly sized older homes.

    Cost Efficiency

    You can build a barndominium for roughly $60-$120 per sq ft depending on finishes, often lower than conventional stick‑built costs once labor and time are accounted for. By using a pre‑engineered shell, doing interior finishes yourself, and grouping plumbing/electrical runs, you’ll shave weeks and thousands of dollars; some DIY owners report 20-35% savings versus hiring a full contractor package.

    Versatile Design Options

    You benefit from wide, open spans that let you configure living, workshop and storage areas however you want: a 30×40 shell converts easily into a 1,200 sq ft home with two bedrooms plus a loft, or into a combined garage/live space with a dedicated workshop. You can mix rustic reclaimed wood, exposed trusses, sliding barn doors and modern glass walls to match farmhouse, industrial or minimalist styles while keeping construction straightforward.

    You should plan layout moves that maximize that flexibility: place wet walls together to limit plumbing runs, use a 10-12 ft clearspan to add a 150-300 sq ft mezzanine, and specify large overhead doors if you want vehicle access. Incorporate built‑in storage, pocket doors and modular furniture so rooms can switch function-home office today, guest suite tomorrow-without costly renovations.

    Planning Your DIY Barndominium

    When mapping your build, prioritize systems and layout together: aim for R-20+ wall and R-38+ roof insulation, a 100-200 amp service with dedicated circuits for workshop tools, and plumbing runs that minimize long traces to the septic or municipal hookup. You should perform a Manual J load calc or hire an HVAC pro to right-size equipment, plan storage and loft access for a 400-1,200 sq ft shell, and place wet walls adjacent to one another to reduce piping complexity and cost.

    Choosing the Right Location

    Pick a site that balances sunlight, slope, and utility access: south-facing exposure boosts passive solar, slopes under 10% reduce grading expense, and having power/water within 200-400 ft can save thousands-running service commonly costs $3-10/ft, while well drilling ranges $5,000-15,000. You should perform a perc test for septic suitability, confirm driveway access for delivery trucks, and plan setbacks of roughly 50-100 ft from property lines if your county requires them.

    Understanding Zoning Regulations

    Zoning controls whether you can place a barndominium on a parcel, covering permitted uses (residential vs. agricultural), minimum lot sizes-often 1-5 acres in rural districts-setbacks (commonly 10-50 ft), lot coverage limits (typically 20-40%), and height caps. You should verify if an agricultural exemption, conditional use permit, or variance is needed; noncompliance can halt construction and trigger costly changes.

    Start by contacting the county planning department for a zoning verification letter and review the parcel’s recorded covenants. Expect to submit a site plan, survey, and permit application; review timelines vary widely (2-12 weeks) and fees range from roughly $100 to $2,000 depending on jurisdiction. If a variance or conditional use is required, prepare neighborhood notices and a case showing mitigation (landscaping, screening, reduced lighting) to improve approval odds.

    Essential Materials for Construction

    Stock your build with steel framing (12-14 gauge for posts, 14-16 gauge for studs), 4″ concrete slab at 3,000-4,000 psi over a polyethylene vapor barrier, galvanized fasteners and neoprene-washer screws, 24-26 gauge metal roofing, 1″-2″ polyiso or mineral wool exterior continuous insulation, Tyvek or ZIP sheathing for weather barrier, PEX for plumbing, a 100A electrical panel with GFCI/ARC protection, and quality window flashing and sealants to prevent air and water intrusion.

    Steel Frame Advantages

    Steel gives you straight, dimensionally stable members that resist rot, termites and fire; 12-14 gauge columns and cold-formed studs at 16″ o.c. let you span larger bay widths with fewer interior posts, enabling open layouts common in barndominiums. Galvanized finishes (G90) extend life in humid climates, and you install them with self-drilling screws, bolting or welding for fast, repeatable framing-many DIY builds cut framing time by 20-30% versus stick framing.

    Insulation and Weatherproofing

    Aim for your specified R-20+ walls and R-38+ roof using a mix: closed-cell spray foam (~R-6.5/in), mineral wool batts (~R-3.1/in) or fiberglass batts (~R-3.4/in) combined with 1″-2″ continuous polyiso to reduce thermal bridging. You should pair an air barrier (taped ZIP or housewrap) with proper flashing, seam tape, and sealed penetrations; use canned spray foam at window frames and through-roof penetrations to maintain airtightness and moisture control.

    For sizing, closed-cell foam needs roughly 3.1″ to hit R-20 and about 5.8″ for R-38; fiberglass batts require ~5.9″ for R-20 and ~11.2″ for R-38. Because steel studs create thermal bridges, add 1″ of polyiso (≈R-6) outside the studs or use insulated sheathing to preserve effective R-value. Seal all seams with tape and use a continuous air barrier system (ZIP/taped sheathing or taped housewrap) to prevent convective heat loss and moisture migration through the assembly.

    Design Ideas for Small Barndominiums

    Focus on layout moves that extend perceived space: orient the long axis south for passive solar gain, install 6-8 windows (24-36″ wide) on that facade, and pair metal siding with cedar accents for texture. You can add a 6-8 ft covered porch to extend living outdoors and plan a 600-900 sq ft footprint to keep mechanical and circulation runs efficient.

    Maximizing Space

    You can use a sleeping loft (120-160 sq ft) and a mezzanine to free ground-floor square footage; install a Murphy bed, 30″ deep kitchen base cabinets, and an 18″ bench with under-seat storage. Keep your main aisles at 36″ for circulation, choose pocket or barn doors, and design stairs with 12-16 cu ft built-in drawers to add storage without expanding the footprint.

    Minimalist Interior Ideas

    You should adopt a 2‑tone palette-white or soft gray walls with warm wood ceilings-and limit furnishings to multi‑use pieces like a sofa bed, nesting tables, and a 24″ deep wall‑mounted desk; favor open shelving over upper cabinets to maintain clear sightlines and reduce visual clutter.

    You can specify compact systems-24″ refrigerator, 24″ dishwasher, stacked washer‑dryer-and plan a 5‑ft kitchen run with a 30″ cooktop and 24″ prep counter. Choose 3000K LED strips under shelves for task lighting, 6-8″ wide floor planks to elongate sightlines, and limit decor to three focal elements per room so your interior stays breathable and easy to maintain.

    DIY Projects for Your Barndominium

    Tackle projects that add function and value quickly: build a 6×4′ kitchen island for $300-$1,200, install a sliding barn door for $150-$400, or create loft storage accessed by a ladder to gain 40-80 sq ft of usable space. You should prioritize projects tied to insulation and systems-keep wall R-20 and roof R-38 targets-then add built-ins, lighting upgrades, and waterproofing; many weekend projects take 6-16 hours and can raise resale appeal by 5-10% in rural markets.

    Custom Shelving Solutions

    You can maximize vertical space with floating shelves, built-ins, or ladder units using 1×10 or 2×12 boards for 12-24″ depths; anchor to studs at 16″ centers with 3/8″ lag bolts for 50-100 lb/ft load capacity. Try reclaimed barn wood for character or birch plywood for clean lines, and incorporate cubbies sized 12×12″ for baskets. For heavier loads, sister a 2×8 ledger to studs and use metal brackets rated for 200+ lbs.

    Outdoor Living Spaces

    Consider a 12×12 deck using composite decking ($8-$12/ft²) or pressure-treated pine ($3-$5/ft²) on 16″ joist centers, with a 6×6-post pergola (10×12′) for shade. You should follow local setback rules and get permits when adding structures; position a 36-44″ fire pit at least 10′ from the house and plan clearances for grills and storage. These additions expand usable living area and increase property appeal.

    For more functionality, run a dedicated 20A GFCI circuit (12/2 cable) to the deck for outlets and 120V appliances and allow 2″ clearance for through-wall transitions. Add integrated bench storage, LED step lighting, and a slight deck slope of roughly 1/8″-1/4″ per foot away from the house for drainage. Use composite hidden fasteners on 16″ joist spacing and choose footings sized to frost depth for your zone to ensure durability.

    Maintenance Tips for Your Barndominium

    Seasonal maintenance keeps your systems running and prevents costly repairs: inspect gutters twice yearly, change your HVAC filters every 90 days (or monthly if you have pets), test smoke and CO alarms quarterly, and service your furnace/AC every fall and spring. Check your foundation and slab for 1/8″ cracks and seal them, monitor moisture in gaps, and service well pumps every 2-3 years. Recognizing routine upkeep saves you from major rebuilds and preserves resale value.

    • Gutters – clean yours twice yearly and inspect for loose hangers or standing water.
    • HVAC – change filters (MERV 8-11) every 60-90 days and schedule annual tune-ups.
    • Plumbing – inspect under sinks and around appliances every 6 months for slow leaks.
    • Septic/Well – pump septic tanks every 3-5 years; test well output annually.

    Roofing and Exterior Care

    Inspect your roof at least twice a year and after storms; look for loose screws, rust, bent panels, and failing sealant around penetrations. Tighten or replace exposed 14-16 gauge fasteners as needed, touch up scratched metal with manufacturer-matched paint to prevent corrosion, and reseal vents/skylights every 5-10 years. Clean your gutters biannually and keep 2-3 feet of cleared perimeter around the shell to reduce moisture and pest entry.

    Interior Upkeep Essentials

    To keep your interior healthy, monitor humidity at 30-50% and use a 30-70 pint dehumidifier in damp climates; inspect behind appliances and under sinks every 6 months, test GFCI outlets and breakers annually, and re-caulk window and door frames every 3-5 years to maintain airtight performance and energy efficiency.

    You should swap HVAC filters (MERV 8-11) every 60-90 days and schedule duct cleaning every 3-5 years; flush your water heater annually to remove sediment and extend life by up to 30%, and pump septic tanks every 3-5 years for a family of four (shorter intervals if you use a garbage disposal). Refinish wood floors every 5-7 years with 2-3 coats of polyurethane, patch hairline drywall cracks with setting-type joint compound, and use low-expansion foam around oversized gaps-these steps often reduce drafts and can lower heating bills by 10-20% in retrofit cases.

    To wrap up

    The practical projects presented empower you to optimize your small barndominium’s layout, improve energy efficiency, and infuse personality using basic tools and affordable materials. By prioritizing insulation, modular cabinetry, lofted sleeping spaces, and multifunctional furniture, you can phase work to fit your budget and skill level. Plan each step, measure precisely, and you’ll achieve durable, stylish results that make your tiny barn home both comfortable and functional.

    FAQ

    Q: What are the easiest space-saving storage projects for a small barndominium?

    A: Use vertical space and multi-purpose builds: install floor-to-ceiling shelving anchored to studs, build a sleeping loft with storage drawers underneath, and add built-in bench seating with lift-up lids. Repurpose sliding barn doors with recessed shelving on the jamb side and mount pegboards or slatwall panels in the workshop or kitchen area for tools and utensils. For garages or work zones, add overhead racks for seasonal items and use ceiling-mounted pulleys for bulky items like kayaks. Construction tips: use 3/4″ plywood for shelves, metal brackets for heavy loads, and confirm fasteners hit studs; seal or use exterior-grade materials in damp locations. Finish with paint or clear coat for durability and label boxes for quick access.

    Q: How do I build a simple, safe loft sleeping area in a tiny barn home?

    A: Plan around ceiling height and load: ensure at least 36-40 inches of usable loft headroom if possible and design joists to carry a minimum 30-40 psf live load. Anchor a ledger to load-bearing studs or use a free-standing timber frame; use 2×8 or 2×10 joists spaced 16″ on center with plywood decking. Include a secure guardrail at least 36″ high and a fixed ladder or compact stairs with handholds-stair treads can double as storage. Provide lighting and ventilation: install LED reading lights, a skylight or vent fan, and proper insulation above the loft to control temperature. Finish with non-slip flooring, mattress platform fasteners, and test structural connections; consult local code for egress and handrail requirements if unsure.

    Q: What are practical tips for installing a compact kitchenette and vital utilities in a tiny barndominium?

    A: Choose compact appliances (24″ fridge, two-burner induction cooktop, combination microwave/convection oven) and plan a galley or single-wall layout to conserve space. Prioritize utility placement: cluster water-using fixtures near the same wall to minimize plumbing runs and place the water heater or tankless unit close to points of use. Run dedicated circuits for major appliances, add GFCI outlets where required, and size the main panel for future expansion. Install a ducted or high-quality recirculating range hood for ventilation and use moisture-resistant cabinets or open shelving. Steps: measure and sketch the layout, rough-in plumbing and electrical to code (hire licensed pros for mains and gas), install cabinets and pantry units, mount appliances, then connect and test systems. Use durable, low-maintenance surfaces like laminate, stainless, or sealed butcher block for counters to extend lifespan in a small-space kitchen.

  • DIY Barndominium Remodels – Transform Your Space Like a Pro

    You can transform a barndominium into a stylish, efficient living space by combining clear planning, prioritized tasks, and proven techniques; this guide shows you how to assess structure, allocate budgets, select materials, and tackle framing, insulation, flooring, and finishes with pro-level results. With step-by-step strategies and safety-minded tips, you’ll manage timelines and contractors to deliver lasting value and comfort to your home.

    Key Takeaways:

    • Start with a thorough structural and layout assessment-confirm foundation, framing, roof condition and involve a structural engineer for any load-bearing changes.
    • Prioritize insulation, moisture control, ventilation and properly sized HVAC to ensure year-round comfort and prevent long-term damage.
    • DIY finish work to save money, but hire licensed pros for electrical, plumbing and major structural tasks; secure permits and budget a contingency fund.

    Planning Your Barndominium Remodel

    Plan permits, structural inspections and load calculations early: hire a licensed engineer for beam and post sizing and request a Manual J HVAC load to right-size equipment. Expect 3-6 months for a shell-to-finish remodel and obtain 2-3 bids per trade so you can compare scopes. Prioritize airtightness and insulation-aim for ceiling R‑38 and walls R‑13 to R‑21-to lower your heating/cooling loads, and factor in site prep, utility hookups and local permit lead times when you schedule work.

    Setting a Budget

    Allocate your budget by system: 30-40% for structure and envelope, 20-30% for HVAC/electrical/plumbing, 15% for finishes, 5-10% for appliances/fixtures, plus a 10-15% contingency. Use per-square-foot estimates to sanity-check: remodels often range $75-$200/ft², so a 2,000 ft² remodel at $100/ft² equals about $200,000. Track every line in a spreadsheet, lock fixed-price bids for major trades when possible, and adjust allocations based on which elements you prioritize.

    Determining Your Style

    Identify a primary style and two supporting elements you’ll repeat throughout: modern farmhouse with shiplap and matte-black hardware, industrial with exposed steel and polished concrete, or rustic with reclaimed wood and leather accents. You should pick a 3-color palette and 2 main materials to maintain cohesion across 1,500-2,500 ft² plans; let lighting, flooring and cabinetry choices reinforce the look so each room reads as part of a single design story.

    You should build a mood board of 10-12 images, then order 3-5 material samples (wood, metal, tile) at $5-$50 each and test them under different light. Commit to one focal element-exposed beams, a masonry wall, or an island-and scale fixtures to it; for instance, use 18-24″ pendants over a 6-8′ island. As a case study, a homeowner transformed 2,000 ft² into modern-industrial with polished concrete and steel finishes for roughly $60,000 and achieved consistent visual cohesion across all spaces.

    Structural Considerations

    Assessing the Current Structure

    Begin by scanning foundation for cracks wider than 1/4 inch, uneven settlement, or moisture intrusion; check floor deflection against an L/360 target and note joist spacing-many barns have 2x8s at 24″ o.c. that won’t meet living loads. Inspect truss connections, metal plates, and sill plates for rot or insect damage. If you plan a loft or heavy equipment, have a structural engineer verify bearing capacities and design live loads (typically around 40 psf for residential floors).

    Necessary Upgrades and Repairs

    Address weakened framing by sistering joists with 2x10s or LVLs, installing glulam or double-LVL beams to close wide bays, and replacing decayed sill plates with pressure-treated timber or steel posts. Tie the shell to the foundation using anchor bolts or plate anchors, add shear walls or moment frames for lateral resistance, and upgrade roof connectors for increased snow or insulation loads. Always submit engineered plans and permits for major beam or foundation work.

    For example, converting a 40’×60′ barn often requires two roughly 30-foot glulam beams supported on steel columns, sistering existing 2×8 joists to 2×10 at 16″ o.c. to meet a 40 psf live load and L/360 deflection, and installing anchor bolts per the engineer’s layout; using Simpson Strong-Tie connectors and proper sill-to-footing straps prevents uplift and ties the retrofit into code-compliant detail.

    Interior Design Ideas

    Balance your barndominium’s industrial bones with warm textures and layered lighting to create five functional zones-kitchen, dining, living, workspace, and mudroom-within a typical 1,800-2,400 sq ft shell; use built‑ins, rugs and pendant grouping to define areas while keeping sightlines open.

    Open Concept Living

    Prioritize 10-12 ft ceilings and anchor the plan with an 8-10 ft kitchen island or a fireplace wall; when removing non‑loadbearing partitions, have a structural engineer size headers and beams, expose trusses as a feature, and mitigate echo using rugs, curtains and upholstered seating to improve acoustics.

    Choosing the Right Materials

    Pair insulated metal panels or SIPs with closed‑cell spray foam (≈R‑6.5/in) for airtight envelopes, specify double‑pane low‑E windows with U‑factor ≤0.30, and combine reclaimed barn wood or engineered hardwood over slab floors to add warmth while matching the barndo aesthetic.

    Match materials to climate and use: engineered hardwood tolerates 20-50% seasonal relative humidity swings better than solid planks, porcelain tile performs in mudrooms and entryways, and polished concrete over a standard residential slab (≈2,500-4,000 psi) is low‑maintenance; also verify VOC ratings, compatibility with steel framing, and manufacturer warranties before final selection.

    Utility Considerations

    When upgrading utilities, focus on capacity and routability: a 200‑amp service is common for barndominiums with workshops or EV chargers, 240‑V circuits handle dryers and welders, and water pressure should sit between 40-60 psi to protect fixtures. 1/4″ per foot drain slope prevents backups, while placing the main panel near future expansions saves conduit runs. You should also map existing septic capacity (750-1,500 gal typical) versus household demand before altering layouts.

    Electrical and Plumbing Updates

    You should plan dedicated 20‑amp circuits for kitchen small appliances, 30-50‑amp circuits for ranges and EV chargers, and AFCI/GFCI protection for bedrooms and wet zones; upgrading from 100 A to 200 A often avoids costly subpanel work. For plumbing, use PEX for long runs and easier bends, size water heaters 40-80 gallons to match household use, and verify septic drainfield sizing against bedroom count and local code.

    Energy Efficiency Tips

    Seal air leaks and prioritize insulation: aim for R‑49 in ceilings and at least R‑13 to R‑21 in walls, insulate rim joists with closed‑cell spray foam, and consider a ductless heat pump with COP ≥3.5 and SEER ≥18 to cut heating loads. LED retrofits cut lighting load by ~75%, and triple‑pane windows with U‑factor ≈0.20 improve winter performance in cold climates.

    • Upgrade to a 200‑amp main if you plan heavy tools, EV charger, or future ADD‑ons.
    • Route GFCI/AFCI circuits to kitchens, bathrooms, and workshops to meet code and reduce fire risk.
    • Use PEX for easier routing and fewer fittings on long barn runs.
    • Knowing your peak load profile (HVAC, workshop, EV) lets you right‑size service and avoid costly panel rework.

    For performance gains, combine air‑sealing with staged insulation: a blower‑door guided retrofit that reduces leakage to under 3 ACH50 can cut heating demand by 30-50%. You can pair R‑49 attic insulation with a 2-3 ton heat pump (SEER 18-20) to achieve paybacks in 3-7 years depending on local rates; check local utility rebates and federal incentives for heat pumps and insulation upgrades.

    • Install continuous ridge and soffit ventilation to protect roof assemblies while insulating.
    • Swap incandescent and CFL bulbs for LEDs to reduce lighting energy by ~75% immediately.
    • Invest in programmable thermostats or zoning for a 10-20% reduction in HVAC runtime.
    • Knowing the expected payback (for example, 3-7 years for a properly sized heat pump in many regions) helps prioritize which efficiency upgrades to fund first.

    Outdoor Spaces

    Extend your living area outdoors by planning a covered porch 8-12 ft deep, a 12×14 ft patio for an outdoor dining set, and a 10×20 ft concrete apron for equipment or RV parking. Use 1/8-1/4 in per ft slope for drainage away from the foundation, and place shade trees 20-30 ft from the shell to cut summer cooling loads by roughly 20-25%. You should prioritize durable hardscapes where you need low maintenance and high use.

    Landscaping Ideas

    Prioritize native species to reduce water and maintenance; grouping plants by water need (hydrozoning) helps you run drip irrigation that can cut water use 30-50% versus spray systems. Apply a 3 in mulch layer to retain moisture and suppress weeds, and use permeable pavers where runoff matters. For pollinators, dedicate a 50-100 sq ft garden of flowering natives that bloom across spring-fall to boost biodiversity and curb pesticide needs.

    Creating Functional Outdoor Areas

    Define zones-cooking, dining, play, storage-and size them: a six‑person dining area needs about 10×10 ft, a fire pit seating circle is typically 8-12 ft diameter. Choose materials by use: poured concrete or pavers for heavy equipment, composite decking for low maintenance seating areas. Plan electrical (20A lighting circuits, GFCI receptacles) and water access early so you avoid retrofits that add thousands of dollars.

    For utilities, allocate a dedicated 50-60A 240V circuit if you plan a hot tub, and a 30A RV outlet for hookups; position outdoor kitchens within 20-30 ft of the main house gas line or plan for a 1/2‑in gas stub to avoid long runs. Consider 3‑4 ft wide walkways for accessibility, 6-8 ft clearances around grills for safety, and LED task lighting at 300-400 lux for prep zones to make the space truly functional year‑round.

    Common Mistakes to Avoid

    Avoidable mistakes derailing projects often stem from poor budgeting, skipped permits, inadequate insulation, and improper load redistribution; in one Midwestern case a 2,400 ft² barndominium overran budget by 40% after hidden rot and electrical upgrades. You should prioritize contingency funds, phased inspections, and realistic timelines to prevent similar setbacks.

    Underestimating Costs

    You might use generic $100-$140/ft² estimates, yet full remodels often hit $150-$220/ft² once structural fixes, HVAC upsizing, and sprayed-foam insulation are included; set a 15-25% contingency, get two contractor bids, and budget for unexpected items like replacing sill plates or upgrading a 100 A panel to 200 A.

    Skipping Permits and Regulations

    Skipping permits to save time can trigger stop-work orders, fines ranging from $500 to $5,000, and insurance denials; you must pull structural, electrical, and septic permits for major changes, and plan for required inspections at footing, rough, and final stages to keep your remodel legal and insurable.

    Plan for 2-8 week plan reviews and permit fees typically $200-$2,000 depending on jurisdiction; when you alter beams or add bedrooms submit engineered drawings, have licensed trades pull trade permits, and schedule inspections for footings, framing, electrical, plumbing, and final occupancy. If you close a sale with unpermitted work the buyer’s lender or appraiser may require costly retrofits or stop the loan, so address permits upfront.

    To wrap up

    Hence you can complete a barndominium remodel like a pro by developing a clear plan, mastering important carpentry, electrical, and plumbing basics, prioritizing structural integrity and energy efficiency, budgeting for quality materials, scheduling inspections, and hiring licensed contractors for complex systems; with careful planning and disciplined execution your finished space will be functional, stylish, and built to last.

    FAQ

    Q: How do I plan a DIY barndominium remodel and secure the necessary permits?

    A: Start by defining your project scope, must-have features, and a realistic budget with a 10-20% contingency for unexpected issues. Photograph and document the existing structure, then get a basic structural assessment from a licensed inspector or engineer if you’ll alter load-bearing walls, rooflines, or foundations. Create rough drawings or a simple floor plan, then check local zoning, building codes, and permit requirements with your county or city planning department; many jurisdictions require stamped plans for structural, electrical, and plumbing changes. Submit permit applications with required drawings, pay fees, and schedule inspections at staged milestones (footing, rough-in, insulation, final). Maintain a project timeline that sequences demolition, structural work, utilities, insulation, and finishes to minimize rework. Track materials, receipts, and inspection reports to avoid delays at sign-off.

    Q: Which structural and utility tasks can I safely tackle myself, and when should I hire licensed professionals?

    A: Suitable DIY tasks: demolition (with proper safety gear), non-load interior framing, insulation, drywall hanging and finishing, painting, flooring, trim, cabinetry, basic carpentry, and installing fixtures. Minor electrical work like replacing outlets or fixtures may be DIY in some areas if you follow code, but major electrical (service upgrades, new circuits, panel work), gas lines, full plumbing rough-in and sewer work, structural alterations to beams or foundation, roof framing, and HVAC system design/installation should be handled by licensed pros. Hire an engineer for beam sizing or when altering load paths. Always pull required permits and schedule inspections for work that affects safety systems; doing otherwise can void insurance and complicate resale.

    Q: How can I achieve professional-looking finishes on a budget during a barndominium remodel?

    A: Maximize impact with thoughtful material choices and prep work: invest in a few high-visibility finishes (entry, kitchen countertops, lighting) and choose durable, cost-effective materials elsewhere (laminate, engineered hardwood, prefinished trim). Rent specialty tools (floor sanders, compactor, finish nailer) to speed work and improve results. Use prefinished or panel products for ceilings and walls to save time, and buy trim and doors in bulk to reduce cost. Prioritize proper surface prep-flat, clean, and primed surfaces lead to better paint and finish results. Learn and practice finishing techniques (caulking, feathering joint compound, sanding between coats, correct paint roller nap) to avoid contractor-level expenses. Phase upgrades to spread cost, and shop surplus, wholesale, or reclaimed-material sources for beams, barn doors, and decorative hardware that match the barndo aesthetic while saving money. Seal and insulate properly to reduce long-term energy costs and preserve finishes.

  • “Curb Appeal For Barn Homes – Exterior Design Ideas That Make Your Barndominium Stand Out”

    Curb appeal transforms your barndominium into a statement – you can combine classic barn elements with modern finishes, select complementary siding and trim colors, add strategic lighting, and design low-maintenance landscaping to frame your entrance; these targeted exterior choices boost value, convey style, and make your home unmistakably yours.

    Key Takeaways:

    • Choose cohesive materials and colors-combine barn-style elements (board-and-batten, metal roof, reclaimed wood) with modern trim and durable finishes to reinforce character and longevity.
    • Design functional curb features-a defined entry, covered porch, oversized barn doors and clear walkways create a strong focal point and improve usability.
    • Use landscaping and lighting to define scale and highlight architecture-layered plantings, structured driveways and well-placed exterior lighting enhance visual impact day and night.

    Understanding Curb Appeal

    You can shape how people judge your barndominium by balancing scale, color, and function-replace a plain garage door with a carriage-style one ($800-$2,500), add layered lighting (3-5 fixtures), and define walkways with a 3-foot-wide path to create instant polish; these changes often cost less than a full remodel yet dramatically alter perceived value and photo-ready presentation.

    Importance of First Impressions

    You have mere seconds-studies show buyers form an opinion in about 8-10 seconds-so a clean roofline, fresh paint on trim, and a neatly staged entry can sway perception immediately; for example, swapping faded house numbers and a worn doormat for brass numbers and a premium welcome mat often yields a clearer, higher-quality impression before anyone steps inside.

    Factors Influencing Curb Appeal

    You must consider materials, color palette, landscape composition, and lighting: metal or standing-seam roofs read modern, board-and-batten siding gives vertical emphasis, and an accent door color (think deep navy or barn red) anchors the facade; combine with 2-4 focal plants and low-voltage path lights to guide the eye and improve safety at night.

    • Siding type and texture-board-and-batten, corrugated metal, or horizontal lap each set a different tone.
    • Roof color and profile-standing-seam metal reads modern and lasts 40-70 years vs. shingles at 20-30 years.
    • Entry composition-door color, hardware, and a 3-foot-wide walkway create a clear focal point.
    • Landscaping-use 2-4 specimen plants, mulch beds, and simple symmetry for low-maintenance impact.
    • Lighting-3-5 layered fixtures (path, accent, porch) increase usability after dark.
    • After staging the entrance, photograph from street level to evaluate sightlines and proportion.

    You can refine these factors by prioritizing high-visibility elements: a front door swap ($300-$1,200 installed), a fresh trim paint job (roughly $1-$3 per sq ft), and two path lights ($150-$400 each) often deliver the highest visual return; implement changes in phases-start with paint and lighting, then add hardscape or specimen trees to extend impact over 6-12 months.

    • Prioritize interventions by sightline: door, trim, roof edge, then planting beds.
    • Budget examples: door swap $300-$1,200, trim paint $1-$3/sq ft, path lights $150-$400 each.
    • Maintenance plan: quarterly mulch and annual trim extend curb appeal longevity.
    • Staging tip: remove clutter and use two matching planters for symmetry.
    • After completing upgrades, walk the property at dusk to confirm lighting balance and adjust as needed.

    Choosing the Right Exterior Materials

    Select materials that balance longevity, look, and upkeep so your barndominium reads as intentional from the street. Combine board-and-batten or reclaimed barn wood for warmth with vertical metal panels for weather resistance; expect installed costs roughly $5-10/ft² for wood and $3-8/ft² for metal, with lifespans of about 20-40 years (wood) versus 40-70 years (metal) when properly maintained. Use accents strategically to reduce long-term maintenance without sacrificing character.

    Wood vs. Metal

    Weigh wood’s tactile, textured appeal against metal’s durability: wood gives rich grain and can be stained or painted but typically needs staining or repainting every 3-7 years and may last 20-40 years; metal is non-combustible, resists rot and pests, and with PVDF or Kynar coatings carries 20-30 year warranties and 40-70 year lifespans. You can mix both-use wood as a 20-40% accent and metal as primary cladding for lower upkeep and strong curb presence.

    Color Selections and Maintenance

    Choose a 60-30-10 palette (primary, secondary, accent) and test samples on 4×4-foot panels to view color at noon and golden hour; dark siding can be 20-30°F hotter in sun, so pair darker colors with reflective roof finishes or added insulation. Expect to repaint quality acrylic finishes every 7-15 years, restain wood every 3-5 years, and increase frequency in coastal or high-UV areas-plan maintenance into your budget when selecting dramatic tones.

    For metal, prioritize coil coatings like PVDF/Kynar for color retention-manufacturers often guarantee 20-30 years against fading; measure potential fade with Delta E expectations when available. Schedule an annual exterior inspection, pressure-wash cladding every 1-2 years, and recaulk joints every 5-10 years. Keep a touch-up kit of original paint/stain and store color codes; small, timely repairs preserve sharp contrasts (black trim, light siding, cedar accents) that make your barndo stand out.

    Landscaping Ideas for Barn Homes

    Use landscape to reinforce your barndo’s rustic-modern aesthetic: plant long, low bands of native grasses and perennials (little bluestem, echinacea, black-eyed Susan) in 3-4 ft beds along the facade, target 60-80% native coverage to cut irrigation and maintenance, mulch beds 2-3 in deep, add stone terraces on slopes to prevent erosion, and place shade trees 20-30 ft from the building to frame views without crowding the roofline.

    Native Plants and Hardscaping

    Select natives like switchgrass, yarrow, salvia, and sedges for seasonal color and pollinator value; combine them with hardscape elements such as decomposed granite paths, reclaimed barnstone retaining walls, and corten steel planters for texture contrast. Use a 3-4 in compacted gravel base under paths, 2-3 in river rock in dry creek beds to manage runoff, and permeable pavers where you want driveway durability without increasing stormwater speed.

    Adding Pathways and Outdoor Spaces

    Dimension paths for real use: make single-walk routes 3 ft wide and main circulation 5-6 ft, space stepping stones 18-24 in for natural gait, and choose materials-gravel, pavers, or poured concrete-based on maintenance and budget. Place small seating pockets and a 10-12 ft patio for casual seating or a 12-20 ft area for dining; include low 12V or solar 3000K lighting for safety and ambience.

    Think about alignment and function when detailing pathways: run primary walks to connect driveway, garage, and main entries in the shortest comfortable lines, allow gentle curves to soften sightlines, grade surfaces for 1-2% drainage away from the barn, and anchor spaces with planting swaths or a 6-8 ft radius fire pit to create focal outdoor rooms that feel intentional and low-maintenance.

    Unique Architectural Features

    Emphasize signature elements like exposed timber trusses, board-and-batten siding, and steel-clad lean-tos to give your barndominium character. Integrate functional touches – a 10-foot covered porch, a cupola for passive ventilation, or a 6-inch foundation reveal – to break large façades into human-scaled bays. Combine reclaimed wood with standing-seam metal and repeat vertical rhythms so a 30-40 foot barn reads as deliberate architecture rather than an industrial shell.

    Roof Designs and Overhangs

    Choose gable, gambrel, shed, or hip profiles based on loft needs and site exposure: a 5:12 pitch balances loft headroom and water shedding while gambrels maximize hayloft-style volume. Specify overhangs from minimal 6-12 inches for a modern edge to 2-6 feet for porches and solar shading; wider eaves protect walls and reduce siding maintenance. Pair standing-seam metal roofs with exposed rafter tails or boxed eaves and plan gutters where roof runoff exceeds 2,000 sq ft to avoid erosion.

    Windows and Door Styles

    Prioritize proportion and performance by using double- or triple-pane, Low-E glazing (aim for U-factor ≤0.30 in cold climates) and steel or black-clad frames for that industrial-barn aesthetic. Mix tall vertical casements, large picture windows, and 3-4 ft-wide entry doors to create focal points; consider 8-foot custom entry doors for drama or insulated glass garage doors to turn bays into light-filled living zones. Hardware in matte black or oil-rubbed bronze reinforces the look.

    Place windows to frame views and control daylight: clerestory bands 6-8 ft above the floor admit light without sacrificing privacy, while grouped 3×5-foot picture windows create intentional vistas. Use operable awnings or casements under overhangs for cross-ventilation, and align heads and sills across bays to maintain rhythm – a consistent 6-12 inch reveal at window surrounds ties mixed materials together and simplifies flashing details for long-term weather performance.

    Lighting for Enhanced Curb Appeal

    Strategic lighting elevates your barndominium’s silhouette after dark – uplight exposed timber trusses with 400-800 lumen spot fixtures, wash board-and-batten siding with soft 2700K LEDs, and edge pathways with 100-300 lumen bollards for safe navigation. You can highlight a metal roof with linear LED strips and use warm-toned sconces flanking the entry to balance rustic texture with modern clarity.

    Functional vs. Decorative Lighting

    Functional fixtures provide safety and task illumination – think motion-activated floodlights at 1,200-2,000 lumens, 12V path lights, and well-placed step lighting. Decorative pieces add character: vintage barn lanterns or oversized pendants in the 400-800 lumen range create silhouette and depth. You should layer both types, placing functional lights first and then adding decorative accents to define scale and warmth.

    Energy-Efficient Options

    LEDs use roughly 75% less energy than incandescent bulbs and last 25,000-50,000 hours, making them the pragmatic choice for exterior lighting; choose IP65-rated fixtures for wet locations. Low-voltage 12V landscape systems reduce installation cost, while solar path lights with 10-20W panels simplify wiring. You can further cut runtime with motion sensors, photocells, and smart scheduling.

    Select LEDs with CRI ≥80 and a 2700-3000K color temperature to keep wood tones rich; target about 400 lumens for a porch, 800-1,200 lumens for security floods. Specify dimmable drivers and photocell controls, and consider marine-grade stainless fixtures for coastal exposure. Typical LED payback ranges 2-5 years depending on hours used and local electricity rates.

    Personalizing Your Barn Home

    Customize your exterior by picking 2-3 signature touches that repeat across the façade-think a reclaimed-wood porch beam, matte-black hardware, and a deep forest-green accent door. Use a limited palette of 2 accent colors to maintain cohesion, size elements to human scale (e.g., 36″ porch swing, 24″ planter boxes), and place focal pieces at eye level so passersby instantly read your design intent.

    Custom Signage and Address Markers

    Choose durable materials like Corten steel, powder-coated aluminum, or reclaimed barnwood and size signs 18-36″ wide so they’re legible from 50-100 ft. Mount 6-8″ address numerals with 12V LED backlighting or halo mounts for night visibility, and use bold, high-contrast fonts. You can add a GPS-friendly line (road name, unit) and standoff mounts to cast shadow and add dimensionality.

    Seasonal Decorations for Impact

    Swap three focal elements-door wreath, porch planters, and mailbox vignette-each season to refresh curb appeal without clutter. In spring use tulips and pastel ribbons in galvanized tubs; summer favors mixed herbs and hanging baskets; fall brings mums, 3-5 grouped pumpkins, and warm 2700K string lights; winter leans to cedar swags and warm white LEDs. Keep palettes simple and weatherproof materials.

    Plan timing and storage: rotate decorations every 6-8 weeks for spring/summer and set fall displays by early October, switching to holiday lighting mid-December. Use UV-resistant fabrics, galvanized or stainless fasteners, and sealed battery- or low-voltage LED fixtures to avoid corrosion. Store fragile items in stackable plastic bins labeled by season and inspect attachments after storms so your displays stay polished season after season.

    Final Words

    So prioritize durable siding, layered lighting, and a welcoming entry to amplify your barndominium’s personality; combine metal accents with warm wood, add native plantings and clear pathways, and use contrasting trim and large windows to create depth. By coordinating materials, scale, and landscaping, you’ll ensure your barn home stands out on the road and delights visitors while holding long-term value.

    FAQ

    Q: How do I choose exterior materials for a barn home that balance authenticity with low maintenance?

    A: Use durable cladding like standing-seam metal for roofs and accents, and board-and-batten or engineered wood/fiber-cement siding for walls to preserve the barn aesthetic while resisting rot and pests. Combine reclaimed wood or natural cedar in small focal areas-porches, gable ends, or entry surrounds-to add warmth without high upkeep. Choose high-quality finishes and sealed joints, specify corrosion-resistant fasteners for metal, and consider a vapor-permeable house wrap beneath siding to manage moisture. For longevity, prioritize materials rated for your climate and specify finishes designed for UV and salt if applicable.

    Q: What color palettes and trim choices make a barndominium stand out without looking trendy?

    A: Timeless schemes include classic red with white trim for a traditional barn look, charcoal or black with natural-wood accents for modern contrast, and warm greys or sage with cream trim for a farmhouse-modern blend. Use a darker roof to ground the structure and lighter trim to frame doors, windows, and eaves. Reserve bright or saturated colors for focal elements-front door, garage doors, or shutters-to create visual interest. Test paint samples on different elevations and view them at multiple times of day to ensure cohesive curb appeal across seasons and lighting conditions.

    Q: What entry and porch features enhance curb appeal and make the home more inviting?

    A: A covered entry or wrap porch scaled to the façade creates depth and human scale; use larger posts or simple metal columns for a barn-appropriate feel. Install a prominent front door or sliding barn door in a contrasting color, flank it with sidelights or windows, and add substantial hardware to reinforce the style. Wide, level steps or a defined landing with textured pavers, planters, and a clear path from the driveway increase usability and presence. Integrate seating, hanging lights, or a porch swing to signal a welcoming outdoor living zone.

    Q: How should landscaping and hardscaping be planned around a barn home to complement its form and scale?

    A: Use layered plantings that step down from the building-structural shrubs at the base, mixed perennials for seasonal color, and native grasses for texture-so the landscape reads proportionally against large barn walls. Keep beds simple and structural near the main façade; add specimen trees or a grove to anchor long elevations. Hardscape elements like a gravel drive, concrete ribbon driveway, or stabilized turf complement rural character; balance them with stone retaining walls, low fences, or timber edging to define zones. Design paths and sightlines that lead the eye to the entry and outdoor living spaces rather than the long, uninterrupted siding.

    Q: Which exterior lighting and accent details amplify curb appeal and safety for barndominiums?

    A: Layer lighting with porch sconces for task and entry illumination, downlighting on eaves for even façade wash, and low-voltage path lights for circulation. Use uplighting to highlight gables or specimen trees and accent fixtures with barn-style finishes to match the aesthetic. Select warm color temperatures (2700-3000K) for a welcoming glow and choose fixtures rated for exterior exposure. Complement lighting with durable hardware-metal house numbers, a prominent mailbox, and coordinated garage door hardware-and thoughtful seasonal or landscape accents like window boxes or a simple pergola to add texture without cluttering the barn silhouette.

  • DIY Barndominium Interiors – Creative Ideas for Stunning Rooms

    Many DIYers like you can transform a barndominium’s raw shell into stunning, livable rooms by combining efficient layouts, layered lighting, durable materials, and personalized finishes; this guide outlines practical techniques for planning zones, maximizing storage, tackling finishes, and adding character so you can create comfortable, stylish spaces that reflect your lifestyle and budget.

    Key Takeaways:

    • Embrace the open-plan layout and create distinct zones with area rugs, furniture placement, sliding barn doors, or half-walls to keep the airy barn feel while defining rooms.
    • Mix raw, rustic materials (reclaimed wood, exposed beams, metal accents) with sleek modern finishes and statement lighting to balance warmth and contemporary style.
    • Use budget-friendly DIY solutions and multifunctional pieces-built-ins, upcycled furniture, modular storage-and layer lighting and textiles to achieve a personalized, high-impact interior.

    Understanding Barndominium Design

    In practice, designing a barndominium blends industrial shell efficiency with residential comfort: you’ll often work around a steel or post‑frame shell, 30-60′ bays, and open interiors that favor 10-14 ft ceilings. Many plans are 1,200-3,000 sq ft; finish level drives costs-roughly $80-$150/ft²-while insulated metal panels and spray foam can cut heating loads significantly. Plan zoning, storage, and utilities early so your open layout functions like distinct rooms.

    What is a Barndominium?

    A barndominium is a hybrid barn-home where living quarters occupy a metal or timber post-frame building; you get an expansive open plan often paired with an attached shop, garage, or studio. Typical builds combine 40×60 or 30×40 bays, and you can outfit raw shells with drywall, reclaimed wood, or exposed trusses to achieve farmhouse, modern, or industrial styles.

    Benefits of Barndominium Living

    You gain affordability, flexibility, and durability: barndominiums commonly finish faster (3-6 months), cost less per square foot than custom stick‑built homes, and feature long‑lasting metal roofs (40-70 years). Energy efficiency improves with spray foam insulation and insulated metal panels, while the open plan makes it easy to adapt spaces for guests, workshops, or rental suites.

    For example, you can design a 1,800 sq ft barndo with a two‑bay workshop and separate ADU for rental income, boosting ROI; closed‑cell spray foam at about R‑6-7 per inch tightens the envelope, and proper roof overhangs plus passive solar orientation reduce HVAC loads. Maintenance falls lower too-metal siding resists rot-and mechanicals are simpler to service in open cavities.

    Choosing a Color Palette

    Pick a palette that ties your steel, concrete and wood elements into a cohesive whole by using the 60-30-10 rule: 60% dominant neutral, 30% secondary tone, 10% accent. You should match neutrals to your flooring LRV and choose lighting around 2700-3000K for warm paint perception. Test swatches on north- and south-facing walls, and note how metal finishes-black powder coat vs. galvanized-shift perceived color before committing.

    Neutral Tones for Versatility

    You can rely on greige, warm taupe or soft gray as a base to make zones flow and brighten an open plan; aim for mid-tone neutrals with LRVs around 30-60 to avoid washout. Pair those walls with raw wood (oak at 10-12% warm undertone) and black or bronze hardware for contrast, then layer texture-wool rugs, linen curtains-to prevent a flat look while keeping flexibility for future color swaps.

    Bold Colors for Accent

    You should use bold hues sparingly-on a feature wall, kitchen island, or entry door-keeping them to roughly 10% of visible surfaces per the 60-30-10 rule. Try barn-red, deep navy, or teal to echo exterior siding or vintage signage; these choices add depth without overwhelming the volume of an open barndominium.

    When dialing in accent colors, test 12″x12″ swatches at eye level and view them at morning and evening light to check undertones. Choose finishes strategically: satin for cabinets, eggshell for walls, semi-gloss for trim and doors. Also, consider complementary materials-deep navy pairs well with walnut and brass, while mustard or ochre livens pale oak and matte black fixtures-so your accents read intentional and integrated.

    Flooring Options

    Because your barndominium blends industrial shell and home comfort, match flooring to function: sealed or polished concrete for workshop entries, LVP with a 12-20 mil wear layer for moisture-prone living areas, and engineered or reclaimed oak (7-9″ planks) for bedrooms. Factor in subfloor insulation, a vapor barrier under slab-on-grade, and typical concrete specs of 3,000-4,000 psi when planning finishes and long-term performance.

    Durable Flooring Choices

    Choose commercial-grade vinyl plank (20 mil wear layer) for garage-to-home transitions, porcelain tile (water absorption <0.5%, PEI 4-5) for mudrooms, and sealed/polished concrete (3,000+ psi) or epoxy coatings for work zones. These resist abrasion, chemicals, and heavy loads; epoxy systems often last 10-20 years with proper prep, while well-sealed concrete floors can exceed 30 years before major refurbishment.

    Aesthetic Appeal

    For visual impact, pair 7″-9″ wide engineered or reclaimed oak for a rustic-modern vibe, or install large-format porcelain with narrow grout joints for a sleek industrial look. You can stain concrete from warm taupe to charcoal, add inlaid metal strips, or lay herringbone and chevron patterns to create focal areas that soften the building’s raw edges.

    Also consider performance with radiant floor heating-tile and concrete conduct heat best, while engineered hardwood tolerates moderate radiant temps; check manufacturer limits (some LVP allows surface temps up to 85°F/29°C). Coordinate finishes with your metal accents and cabinetry using a 2-3 color palette, vary plank widths for scale, and plan transitions plus underlayment to control sound in your open-plan spaces.

    Open Concept Layouts

    With vaulted ceilings often between 12-16 feet and footprints from 1,200-2,500 sq ft, you can make an open-plan barndominium feel intentional by zoning rather than enclosing. Place the kitchen as the central hub, anchor seating with a 5×8 or 8×10 rug, and align lighting runs over an 8-foot island to define function. Use consistent flooring-wide-plank hardwood or polished concrete-to preserve sightlines and boost perceived space.

    Maximizing Space

    You gain usable square footage by choosing built-ins, multiuse furniture, and clear circulation: aim for 36-42 inch walkways and a 42-48 inch-deep island with seating to avoid bottlenecks. Install 12-18 inch-deep floating shelves, under-stair drawers, and a lofted mezzanine for a 100-300 sq ft bonus area. In smaller barndominiums, switchable Murphy beds and nesting tables preserve openness while adding function.

    Creating Flow Between Rooms

    You preserve flow by aligning primary sightlines and circulation along the building’s long axis and keeping transition widths at least 36 inches; use 6-8 foot sliding barn doors or 42-inch half-walls to allow visual connection while providing acoustic separation. Coordinate material palette-same trim, flooring color, and 2700-3000K lighting-to make movement between zones feel seamless.

    For deeper impact, use layered lighting and consistent horizontal lines to guide the eye: a 3-foot-wide runner, staggered pendant spacing of 24-30 inches, and area rugs that overlap thresholds by 6-12 inches. You can also angle furniture to create natural pathways, place a console table at a 36-inch clearance to funnel traffic, and employ glass transoms or clerestory windows to maintain daylight continuity while defining separate functions.

    Kitchen Inspiration

    Turn your kitchen into a functional showpiece by pairing a 7×4 ft island with 36″ counter-height seating for three, 3cm quartz countertops, and a 30-36″ professional range. You can preserve flow in an open-plan barndominium by keeping the work triangle (sink, stove, fridge) between 12-26 feet total and using a low-profile bench or pendant grouping to anchor the dining area. Use warm metals and reclaimed wood to balance industrial beams with a refined finish.

    Modern Fixtures and Finishes

    Choose matte black or brushed brass faucets, 3cm quartz or honed granite countertops, and 3000K LED undercabinet strips at roughly 300 lumens/ft for effective task lighting. You can install a 33-36″ farmhouse or undermount sink and pair it with a 30-36″ stainless hood to match pro-style ranges. Coordinate hardware in 2-3 finishes to keep the palette intentional while highlighting rustic elements.

    Functional Design Elements

    Optimize your layout with 24″ deep base cabinets, 18-21″ deep drawers for pots, and a 30-36″ pantry walkway to ease traffic. You should place the dishwasher within 24″ of the sink and allow 42-48″ of circulation around islands for comfortable entertaining. Add pull-out spice racks, vertical tray dividers, and a dedicated baking drawer to free countertop space and speed up meal prep.

    In a recent 1,800 sq ft barndominium remodel you can replicate, the designers used a 7’×4′ island with nine deep drawers, a 36″ dual-fuel range, and a 6′ walk-in pantry with adjustable shelving every 3″ to maximize storage; overhead pot racks and toe-kick drawers increased usable space by about 20%. Consider integrated charging drawers, pull-out trash/compost bins, and tile laid on a diagonal to visually widen aisles while keeping everything within reach.

    Living Room Ideas

    Cozy and Inviting Spaces

    Anchor your living room with an 84″ sofa and an 8×10 rug to create a clear seating zone; add a 36-48″ coffee table and two 22-26″ side tables for balance. Layer lighting with 3000K recessed LEDs for ambient light, a 12-14″ pendant over the coffee table, and a floor lamp providing 1,200-1,600 lumens for reading. Use 4-6 mixed-texture throw pillows and a 60-80″ bench near the entry to make the space feel lived-in and welcoming.

    Incorporating Rustic Elements

    Mix reclaimed wood accents-8-10″ wide ceiling beams or a 6-8″ shiplap accent wall-with matte-black hardware and industrial lighting to get an authentic barndominium look. You can install a 36″ sliding barn door for room separation, add wrought-iron sconces spaced 6-8 ft apart, and choose distressed oak or pine planks in 6-8″ widths to ground the room visually without overwhelming the open plan.

    You should balance rustic textures with smooth surfaces: pair a reclaimed-wood mantel (4-6 ft) with a 48″ gas or electric fireplace, and contrast a rough plank wall with polished concrete or sealed 3/4″ hardwood floors. For DIY economy, source 100-200 sq ft of salvaged barn wood for an accent wall, prefinish boards with a clear matte polyurethane, and use hidden fasteners or Simpson straps where visible connections are needed for a clean, professional finish.

    Conclusion

    From above, you can apply practical design strategies-mixing reclaimed materials with clean fixtures, maximizing light and storage, and tailoring layouts to your lifestyle-to create cohesive, stylish barndominium interiors; by prioritizing durable finishes, layered lighting, and thoughtful zoning, you ensure each room is both beautiful and functional, reflecting your tastes while optimizing comfort and long-term value.

    FAQ

    Q: How can I blend rustic and modern elements in a barndominium interior?

    A: Start by establishing a balanced palette: warm, natural woods and matte blacks or charcoal grays for a modern edge, with neutral walls to keep the space light. Retain structural features-exposed trusses, steel posts, or reclaimed wood beams-and pair them with streamlined furniture (clean lines, low profiles) to avoid visual clutter. Mix materials selectively: a metal-framed sofa with leather upholstery, a live-edge wood dining table with minimalist metal legs, or concrete countertops softened by wood shelving. Use modern lighting (linear pendants, recessed cans) to highlight rustic focal points like a stone fireplace or reclaimed-wood accent wall. Anchor rooms with area rugs and textiles that introduce texture and warmth-wool, linen, woven jute-while keeping patterns subdued. Keep finishes cohesive by repeating two or three materials/tones throughout the home so transitions feel intentional, and choose hardware and fixtures in consistent metals (black, oil-rubbed bronze, or brushed nickel).

    Q: What are high-impact, budget-friendly DIY upgrades for barndominium rooms?

    A: High-impact, low-cost projects include: 1) Accent walls using reclaimed wood or tongue-and-groove boards-cut, sand, and finish with Danish oil or stain for a custom look; 2) Painting cabinets and swapping hardware for kitchens and bathrooms-use a durable bonding primer and satin or semi-gloss paint; 3) Installing open shelving with metal brackets and stained wood planks for both storage and display; 4) Building a sliding barn door from plywood or reclaimed boards and a simple track kit to save space and add character; 5) Updating lighting with energy-efficient LED fixtures and layered lighting (ambient, task, accent) to transform mood; 6) Creating built-in seating with storage (window bench or dining banquette) from plywood and paint; 7) Laying affordable vinyl plank flooring that mimics wood for durability and easy upkeep. For each project, plan measurements, buy quality fasteners/adhesives, and test finishes on scraps. Typical budgets: accent wall $50-$300, cabinet refresh $100-$600, barn door $150-$400, shelving $30-$200 depending on materials.

    Q: How do I design flexible, multifunctional rooms in an open barndominium layout?

    A: Begin by mapping primary functions (sleeping, cooking, working, entertaining) and traffic flow. Define zones with furniture placement-sofas and shelving that act as visual dividers, rugs to delineate seating areas, and back-to-back counters for kitchen vs. living separation. Use movable elements: rolling islands, folding tables, and lightweight screens to reconfigure space quickly. Integrate vertical storage and built-ins to keep clutter controlled and maintain openness. Employ layered lighting: zone-specific fixtures plus dimmers to adapt ambiance. For acoustic control, add soft surfaces-ceilings baffles, heavy curtains, rugs-to reduce echo in high ceilings. Plan utilities early: locate plumbing and large appliances where future layout changes are feasible, and design HVAC with zoning in mind. For privacy, incorporate sliding doors, pocket walls, or lofted partitions while preserving sightlines. Create clear circulation paths (minimum 36-42 inches where possible) and test layouts with cardboard templates or painter’s tape on the floor before committing.